The basic principles of the Alekhine Defense are :
Black provokes: they immediately attack the e4 pawn.
White gains space by pushing their pawns (e5, d4, c4…), and Black then aims to undermine this overextended center.
It is a hypermodern defense : you invite the opponent to build a large central structure, then dismantle it with targeted attacks.
Strengths
A surprise defense, not well understood in depth by many players.
Avoids heavy theoretical lines (Ruy Lopez, Sicilian, French).
Allows Black to obtain counterplay right from the opening.
Ideal for players who enjoy maneuvering and dynamic positions.
Weaknesses
Lets White build a large center.
If Black misses the right timing to attack it, they may end up being suffocated.
Some variations are objectively a bit “dubious” if White plays with precision.
The “Exchange with e” Variation
The basic idea
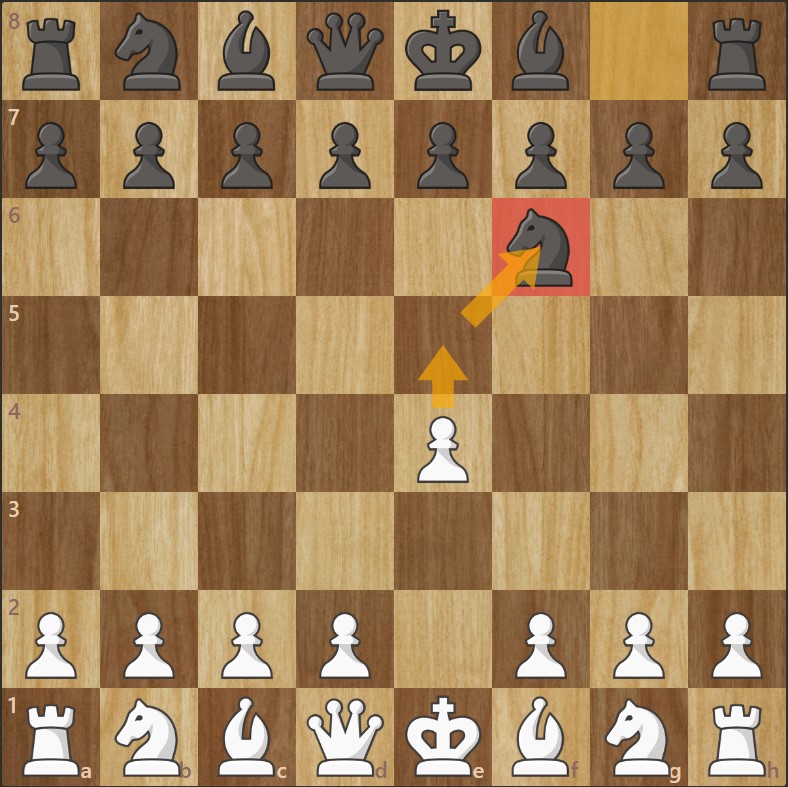
1. e4 Nf6
White opens with e4.
Black chooses to attack the e4 pawn directly by developing their knight first.
2. e5
White counterattacks the knight with the pawn and gains space in the center.
This is the core idea of the Alekhine Defense: allowing White to take space in order to counterattack it more effectively later
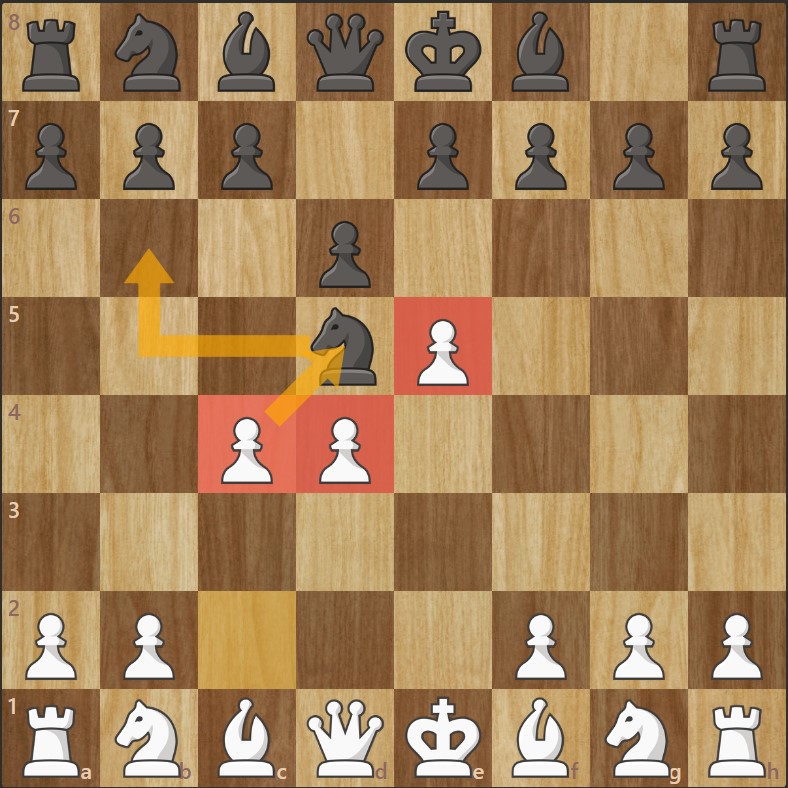
A full White center
2… Nd5
3. d4 d6
4. c4
After four moves, the knight is chased to b6. White occupies the center with their c-, d-, and e-pawns!
Black captures with e
4…Nb6
Black’s knight retreats to b6.
5. exd6 exd6
White initiates the exchange on d6.
Black chooses to maintain a symmetrical pawn structure (4 vs 4 on the queenside and 3 vs 3 on the kingside).
Continuation of development
Both sides continue their usual development by activating their minor pieces (knights and bishops) first.
White should prefer developing their g1-knight to e2.
This prevents an annoying pin and keeps the option of pushing the f-pawn (f3).
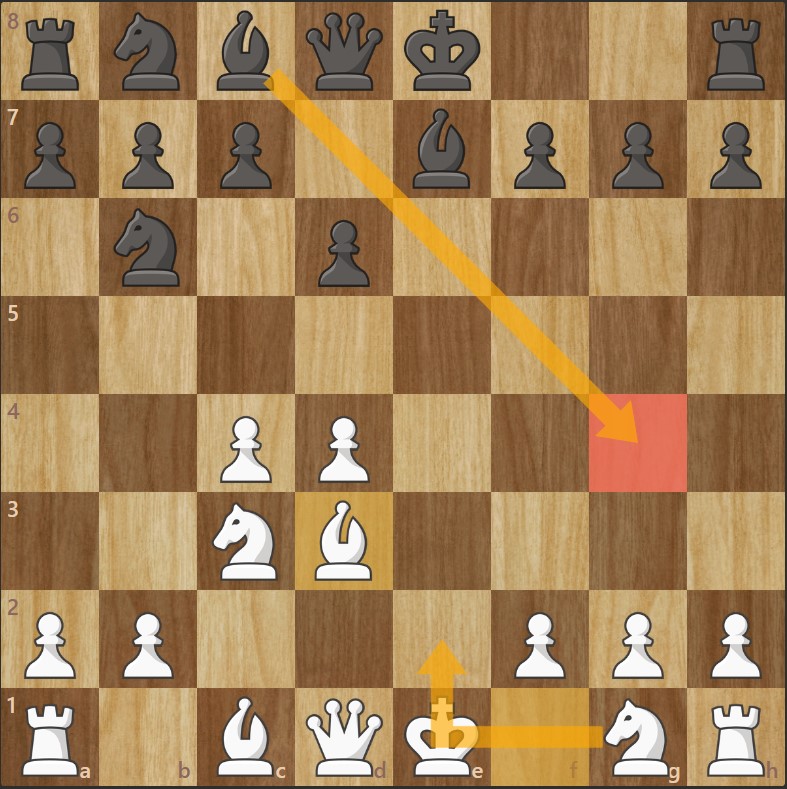
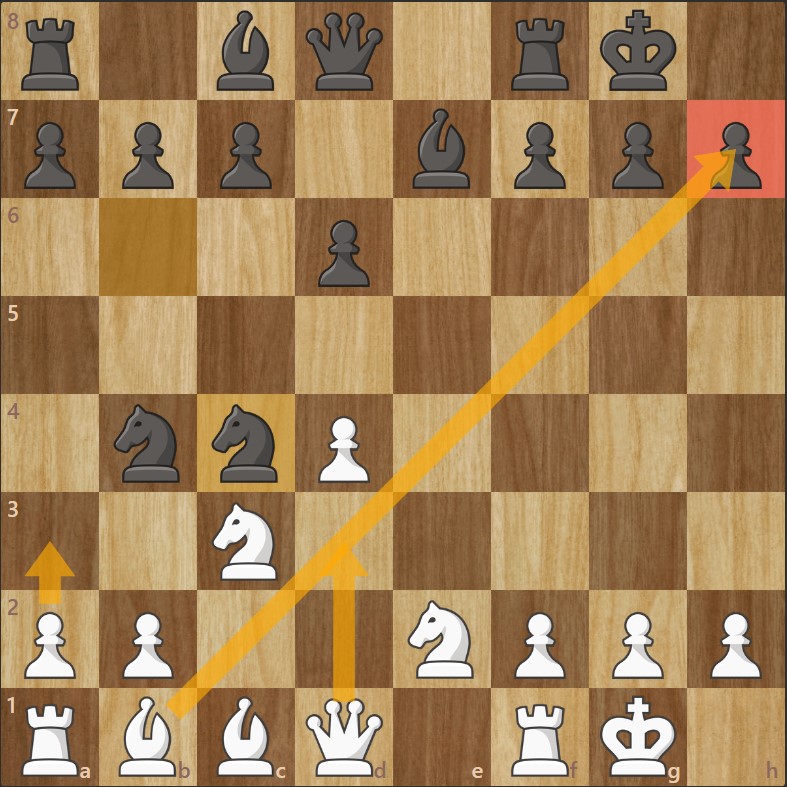
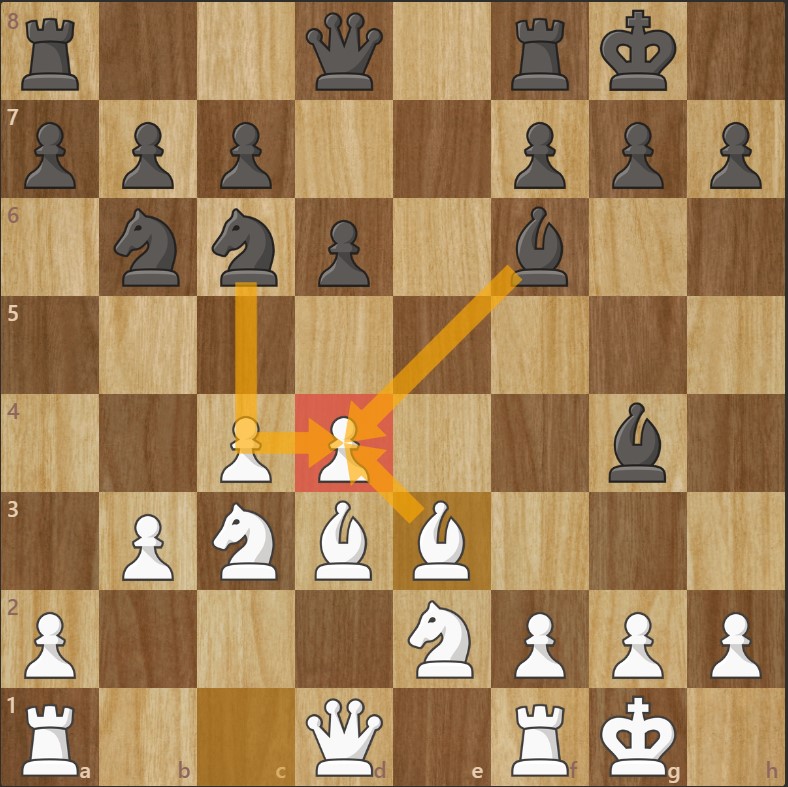
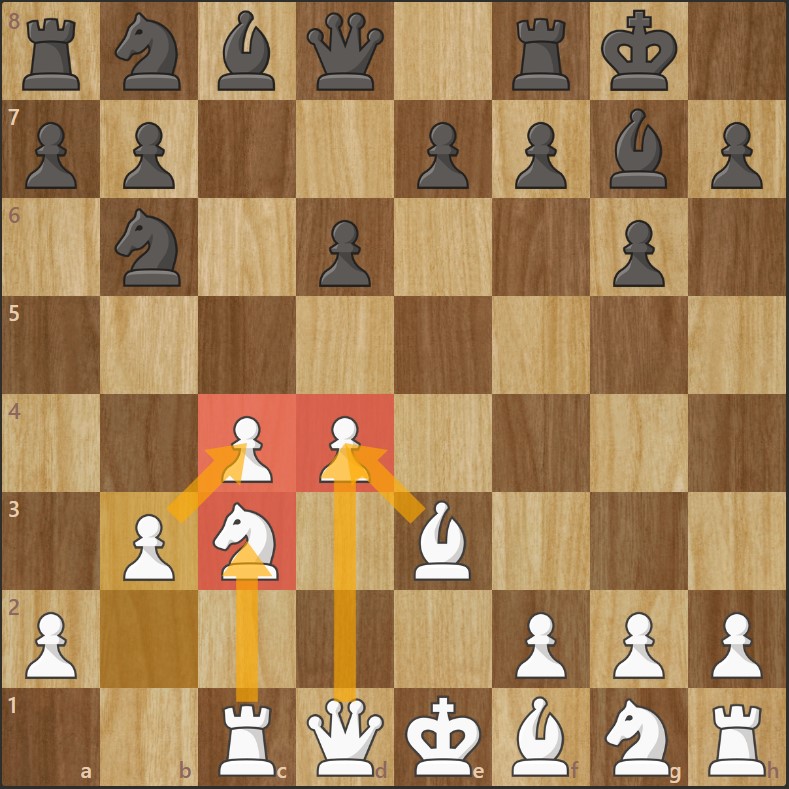
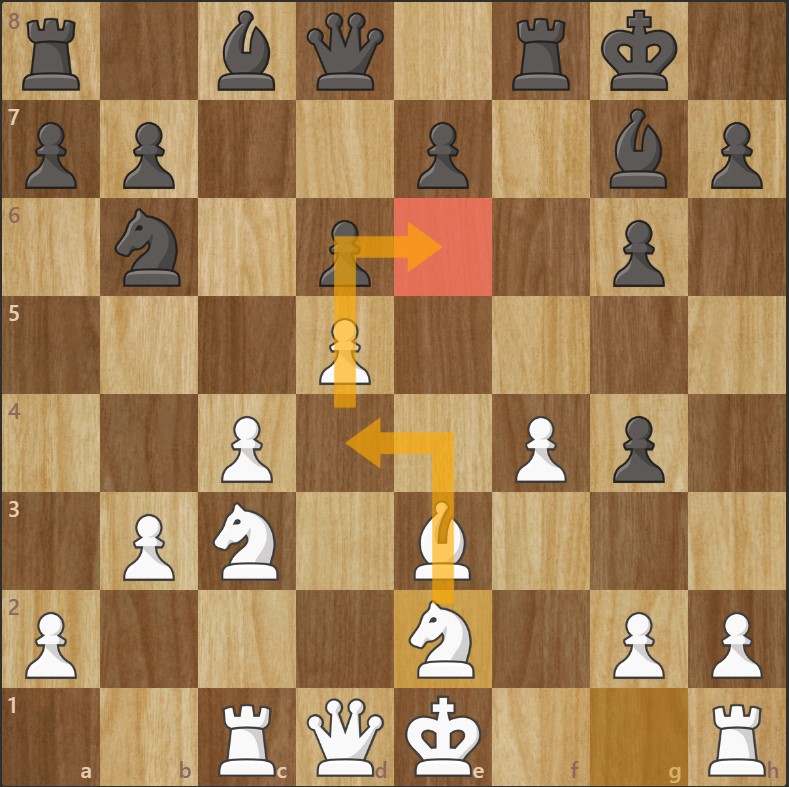
The White trap
As the opening continues, after:
8…Nb4
Black threatens the bishop on d3, which is the only defender of the c4 pawn.
White can, however, retreat their bishop safely to b1.
WARNING : If Black captures the pawn on c4 (Nxc4), the white queen can come out with check and capture one of the two unprotected and aligned knights.
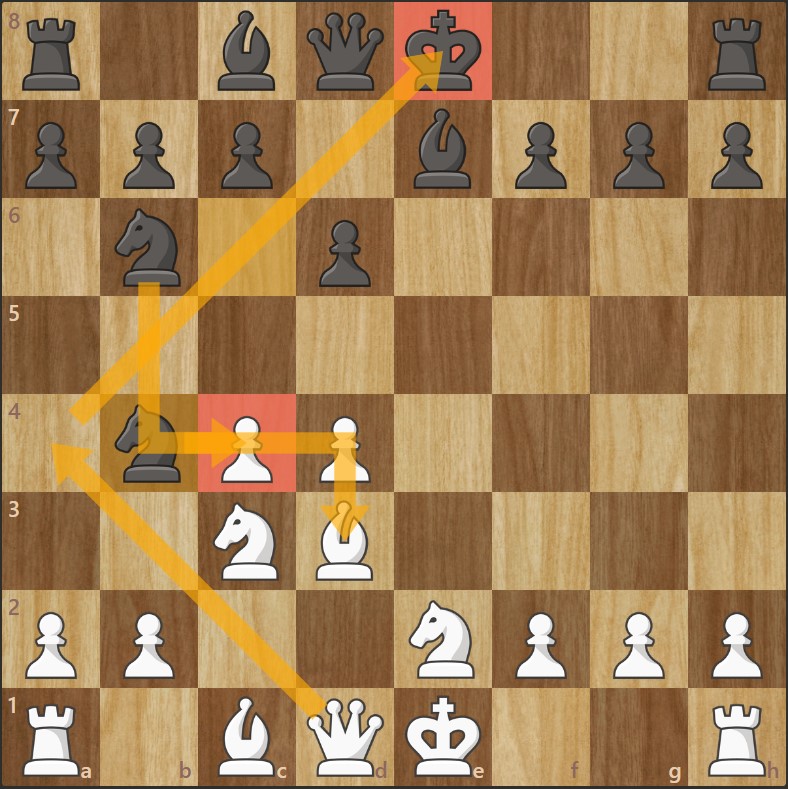
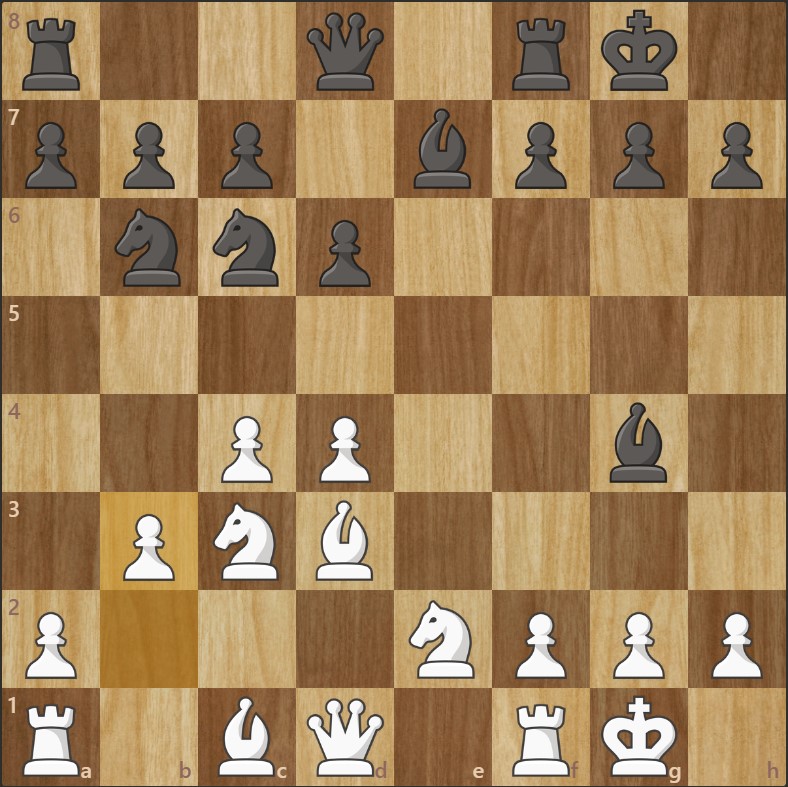
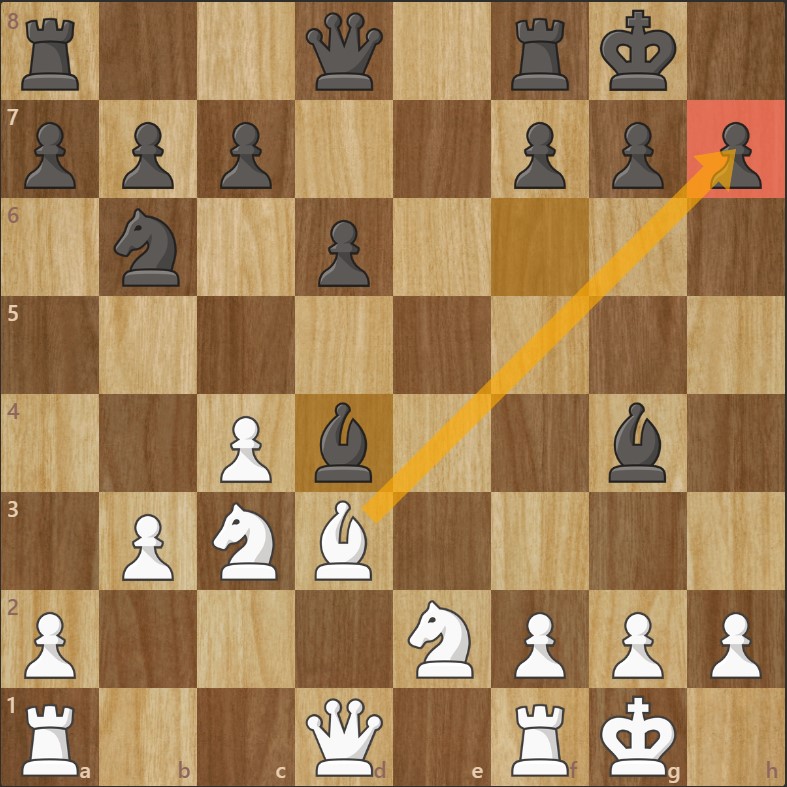
The other White trap
In this situation, both sides have just castled kingside as an intermediate move, which keeps the black king safe from a check + attack like the one described earlier.
If Black then decides to play:
10… Nxc4
Black captures the undefended c4 pawn.
11. a3
White chases away the knight on b4, which must retreat. Then…
12. Qd3
White threatens the second undefended knight on c4 — and above all, mate on h7!
The position would be winning for White.
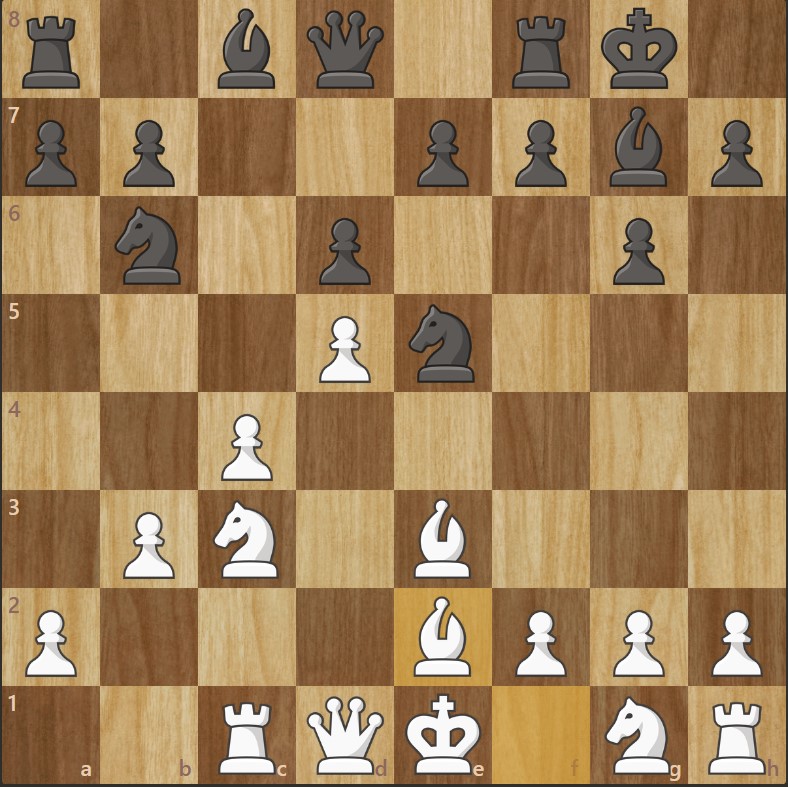
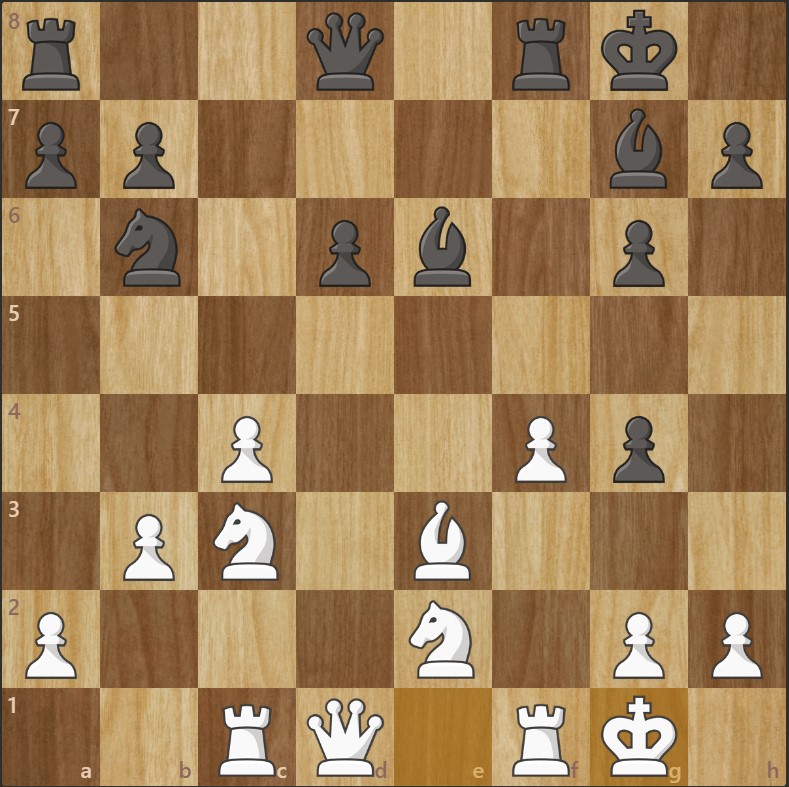
The “correct” position
9… Bg4
Black develops their light-squared bishop, pinning the knight on e2.
White’s first instinct might be to chase this bishop with f3. But it is better to play…
10. b3
White strengthens their structure, and especially the c4 pawn, which will be Black’s main target during their counterattack.
At the end of this opening sequence, and in the position shown above, the game is equal.
First possible continuation
10…Nxd4
Black decides to exploit the pin and captures the d4 pawn.
11. Bxh7+
White captures the h7 pawn with check, and will then recapture the knight on d4, which is attacked by discovery.2143
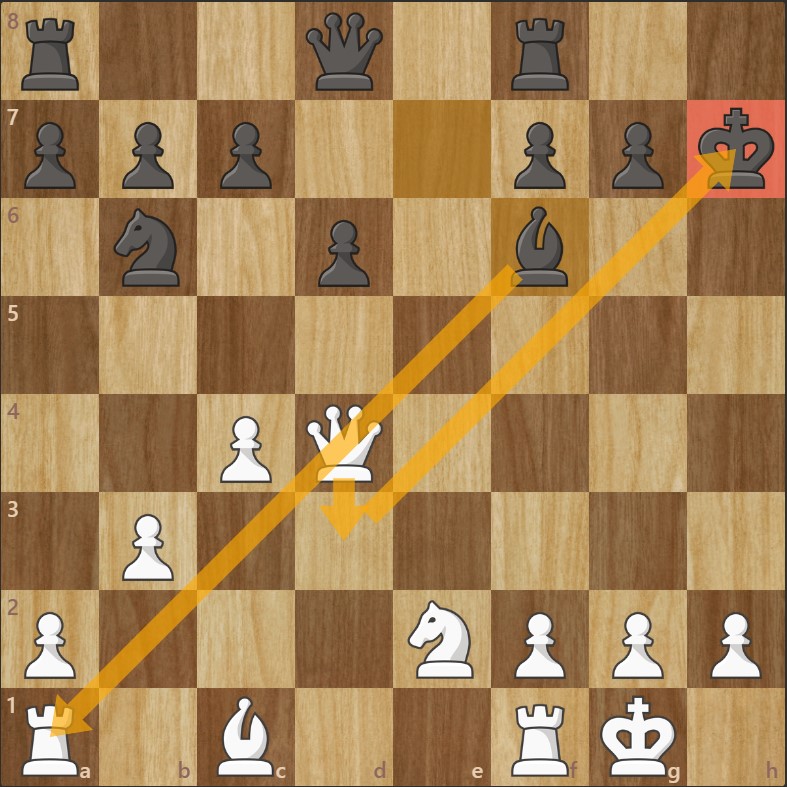
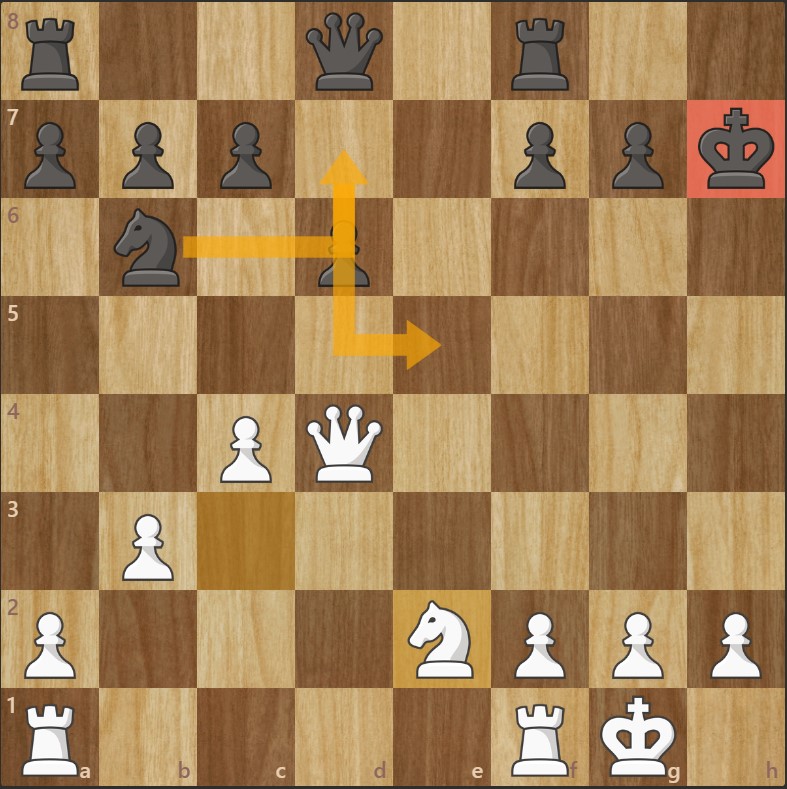
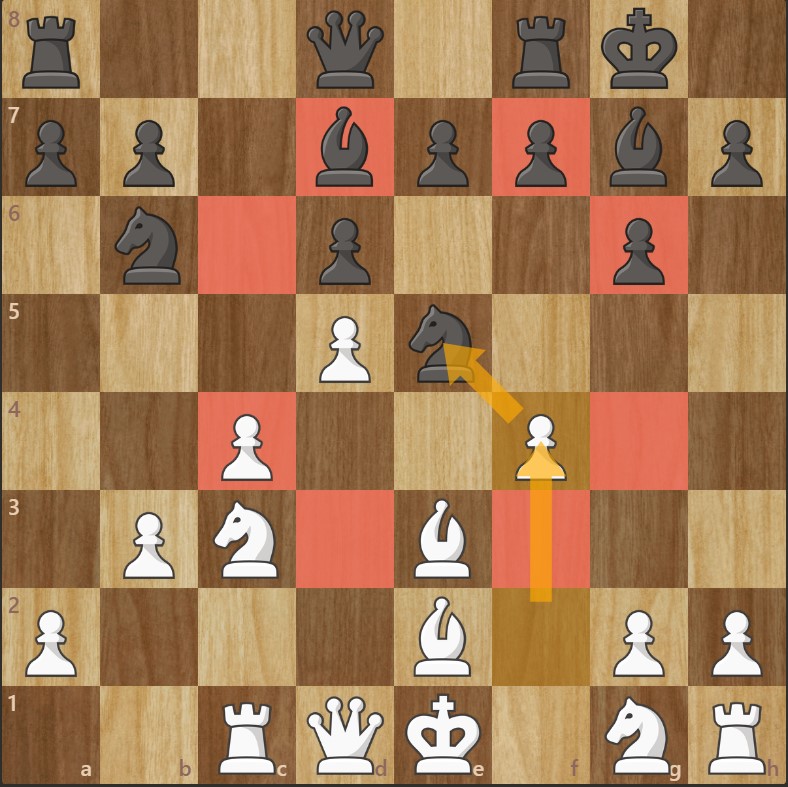
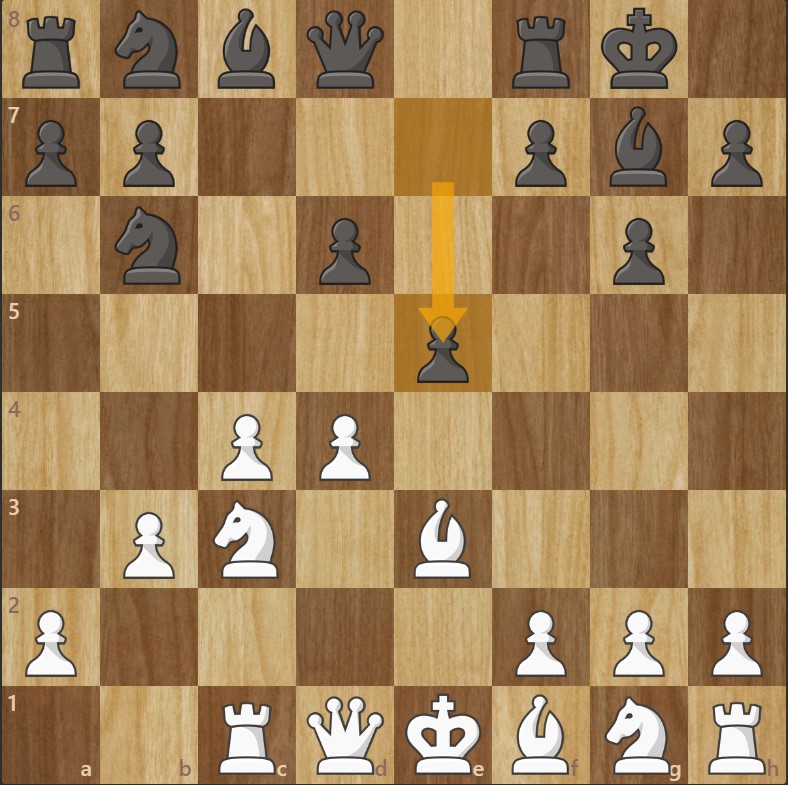
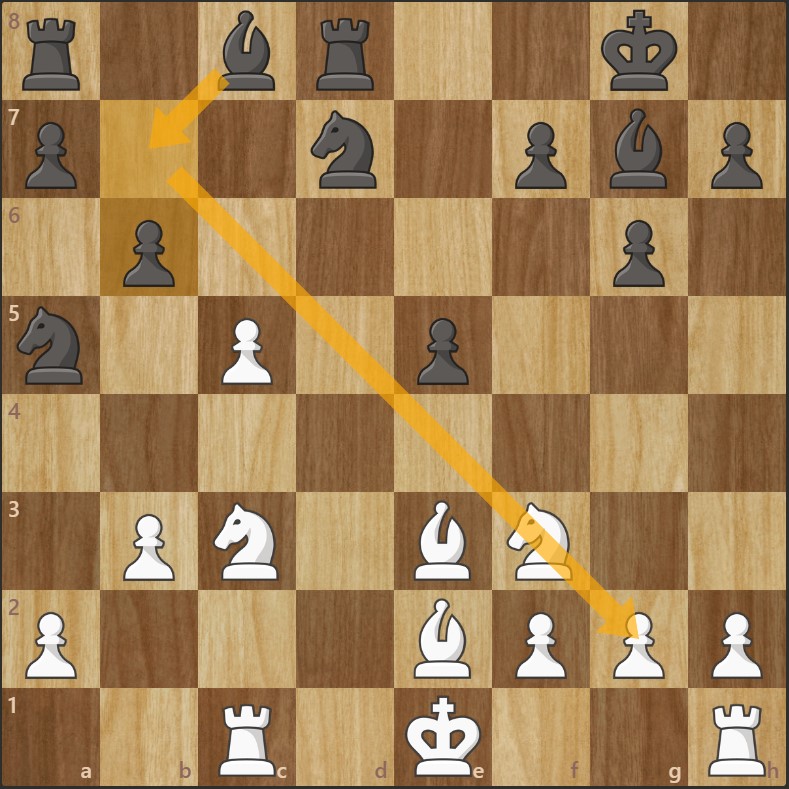
After the skirmish
At the end of the exchange sequence shown below, Black may believe they are winning a rook thanks to a bishop fork from f6.
White can prevent this by shifting the queen, giving an intermediate check that allows the rook to escape as well (see diagram).
11. Bxh7+ Kxh7
12. Qxd4 Bxe2
13. Nxe2 Bf6
14. Qd3+
Second possible continuation
10…Bf6
Black adds a second threat to the d4 pawn.
11. Be3
This appears to be the only active defense of White’s d4 pawn.
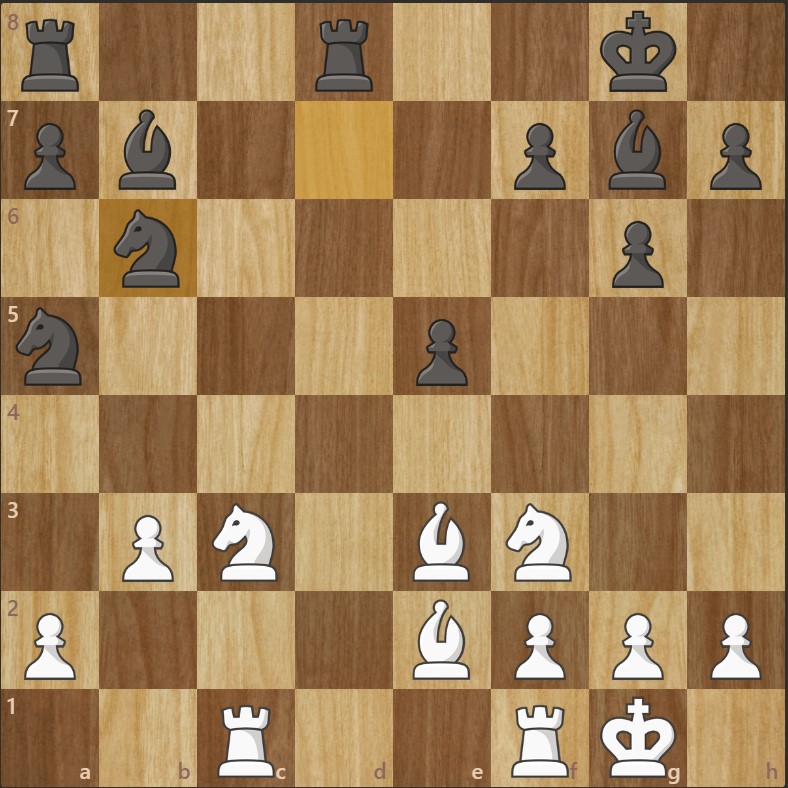
The counter
After the exchanges on d4, White will follow the same method as before to recover their material.
Namely:
13. Bxh7+
White captures the h7 pawn with check, and then recovers the bishop on d4, which is attacked by discovery and left undefended.
End of the sequence
The position after this sequence is relatively balanced (a slight advantage for White at +0.47).
The main goal for Black will be to bring their king back to safety and to reactivate their knight, which is currently very passive on b6.
The “Capture with c” Variation
Asymmetric play
Let’s now look at the plans each side might have if, on move 5, White recaptures with the c-pawn.
5…cxd6
The pawn structures are now asymmetric. The queenside will be dominated by White, while the kingside will be dominated by Black.
The logical continuation
Since Black has made it harder to develop their bishop via the usual path, they decide to fianchetto it to take control of the long diagonal.
Nc3 g6
Be3 Bg7
Rc1 O-O
b3
With Black controlling the long diagonal (a1–h8), White’s goal will be to clear their vulnerable pieces from that diagonal and to consolidate the center.
The White wave
Both sides will look to complete their development. Black will often play:
9…Nc6
to which White will respond with d5 to chase this knight away.
At this stage, Black still has one bishop left to develop — but must be careful not to get caught off guard…
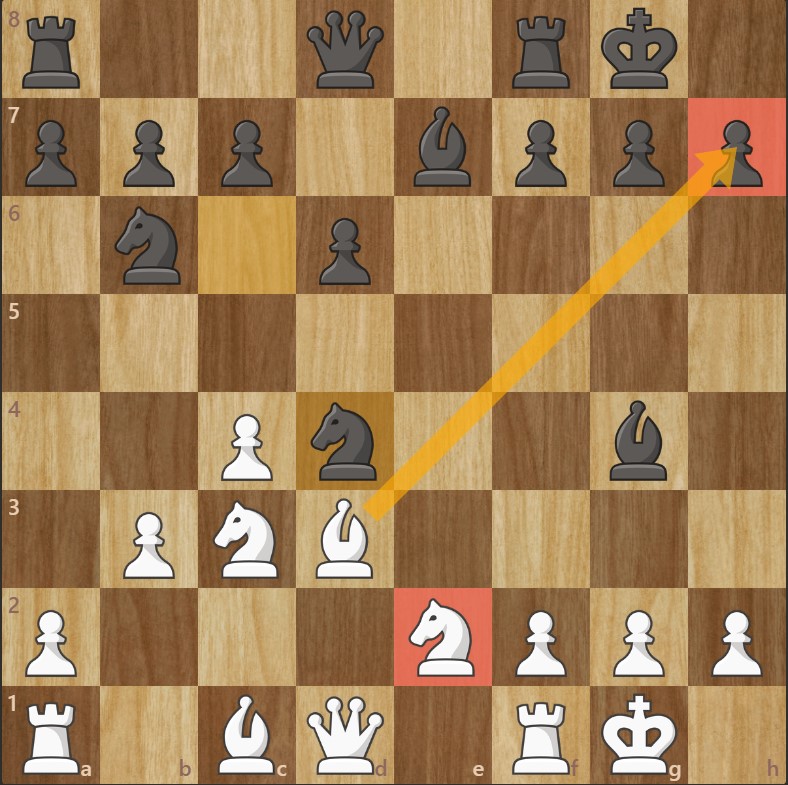
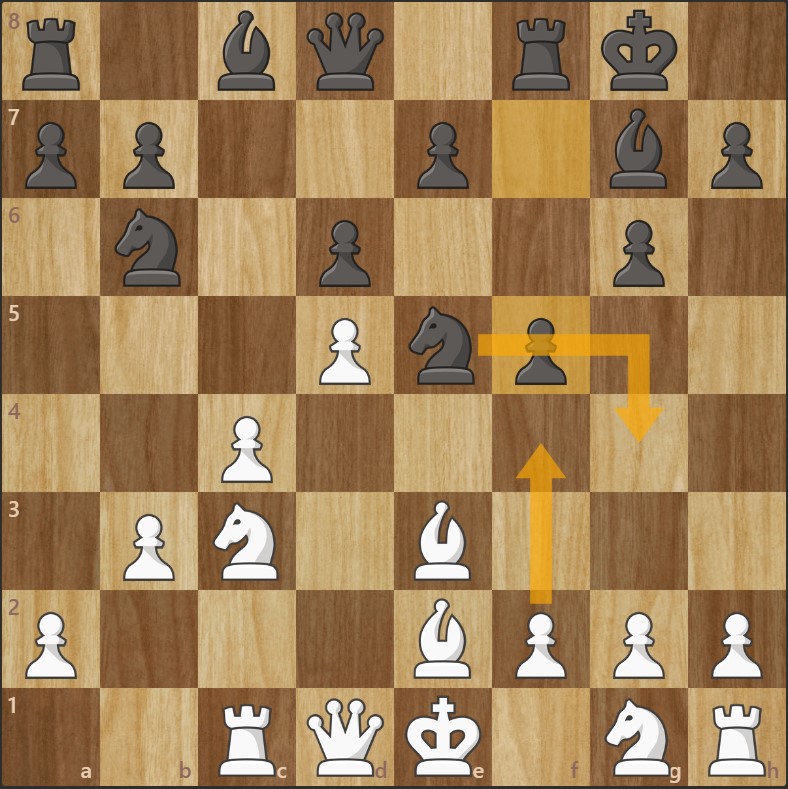
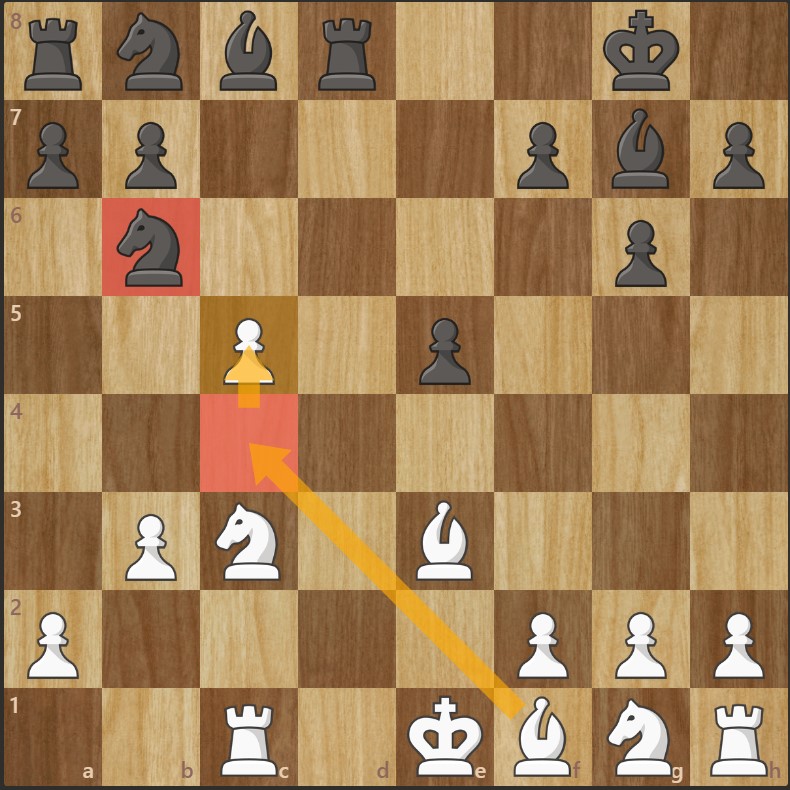
The targeted knight
If Black completes their development with:
11… Bd7
They block the last possible escape square for their knight on e5 (see diagram).
12. f4
White wins the knight. Black must avoid this fairly common mistake !
To avoid this...
11… f5
Black advances on their pawn-majority side.
This creates a second escape square on g4 for the knight if it is chased away by f4 (which will often happen).
The continuation
12. f4 Ng4
White chases the knight.
Black repositions it on g4.
13. Bxg4 fxg4
The exchange takes place on g4: bishop for knight.
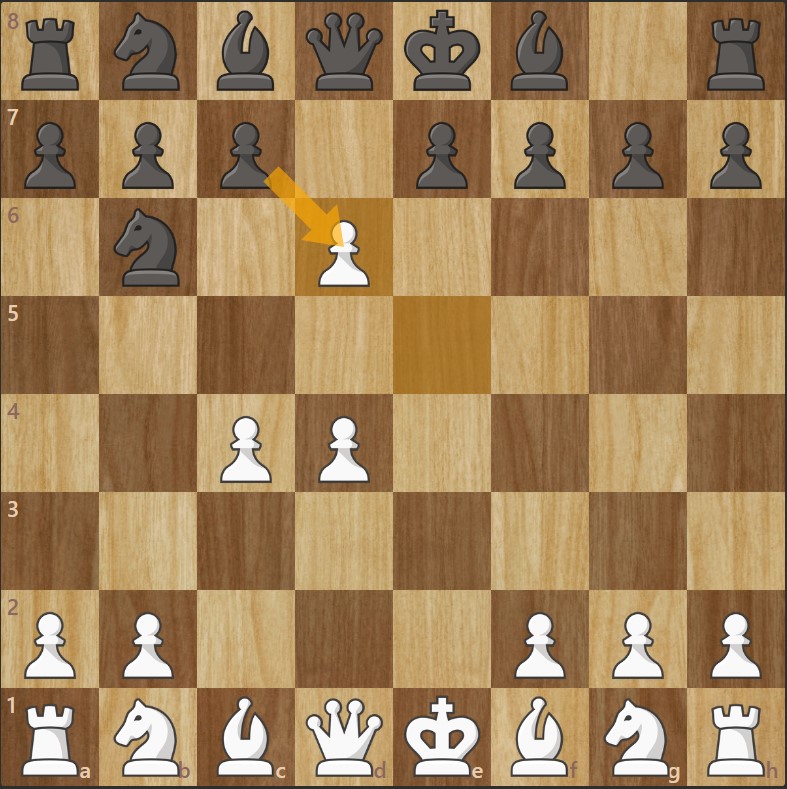
14. Ne2
White develops their last minor piece, aiming for the strong e6 square (see diagram).
Summary of the position
After 16 moves, the position might look like this. White has a clear advantage (+1.26), even though the work is not yet finished.
What can we observe?
Both kings are safe.
Black has an isolated and backward pawn.
Black still has the bishop pair, and they are active.
Both white rooks are already active.
A lot can still happen, especially in such an open position. Your turn to play !
Alternative for Black
If on move 9 Black decides to push e5,
The goal is to delay developing the knight on b8, in order to avoid having it chased away (as in the variation shown previously).
This leads to a major simplification in the center of the board, taking the game into an endgame.
After the queen exchange
10. dxe5 (en passant) dxe5
11. Qxd8 Rxd8
Queen exchange.
12. c5
White chases away the black knight and creates a strong development square for their light-squared bishop.
Objective: double fianchetto
Here the advantage for White is only +0.43. The position is almost equal :
Black will rely on the strength of their two bishops, which control the two longest diagonals on the board.
White will try to play using their pawn majority (2 vs. 1) on the queenside.
Middlegame
After about twenty moves, the position is balanced, but:
Black will need to be very precise to stay in the game.
White has more “natural” moves that are easier to find.
Time matters
In this kind of position, the time spent on each move becomes a crucial factor.
If you are playing with a clock, White’s practical advantage will likely be much greater than what the computer evaluation suggests.
A human player does not have the calculation speed or accuracy of a computer and will therefore take more time to find their moves.
Since Black’s precise moves are harder to find in this position, White should try to play quickly.