

Le Gambit Dame
- White offers the c4 pawn in exchange for stronger central control.
- If Black accepts (…dxc4), White aims to recapture quickly or exploit the gained tempo.
- If Black declines (…e6 or …c6), they maintain a solid but more passive structure.
- White’s idea: establish long-term central dominance with e4 or pressure the c-file and d-file.
In the explanations that follow, we will look at both the Queen’s Gambit Accepted and the Queen’s Gambit Declined.
Strengths
It is an extremely solid and respected opening, used by nearly all World Champions.
It gives White a powerful and flexible center.
It leads to very rich positions, both tactically and strategically.
Strong potential for long-term pressure with minimal early risk.
Weaknesses
If Black knows the theory well, they can equalize quite quickly.
The sacrificed c4 pawn can sometimes be held by Black (with …b5), forcing White to prove their compensation.
Some variations (e.g., the Slav Defense or the Albin Counter-Gambit) can surprise unprepared players.
The game is often more strategic than tactical, which may not appeal to players who prefer sharp, fast battles.
Queen’s Gambit Accepted
More suitable for intermediate to advanced players.
Beginners will generally find it easier to play the Queen’s Gambit Declined.
White’s proposal
1. d4 d5
- White occupies the center.
- Black mirrors the move.
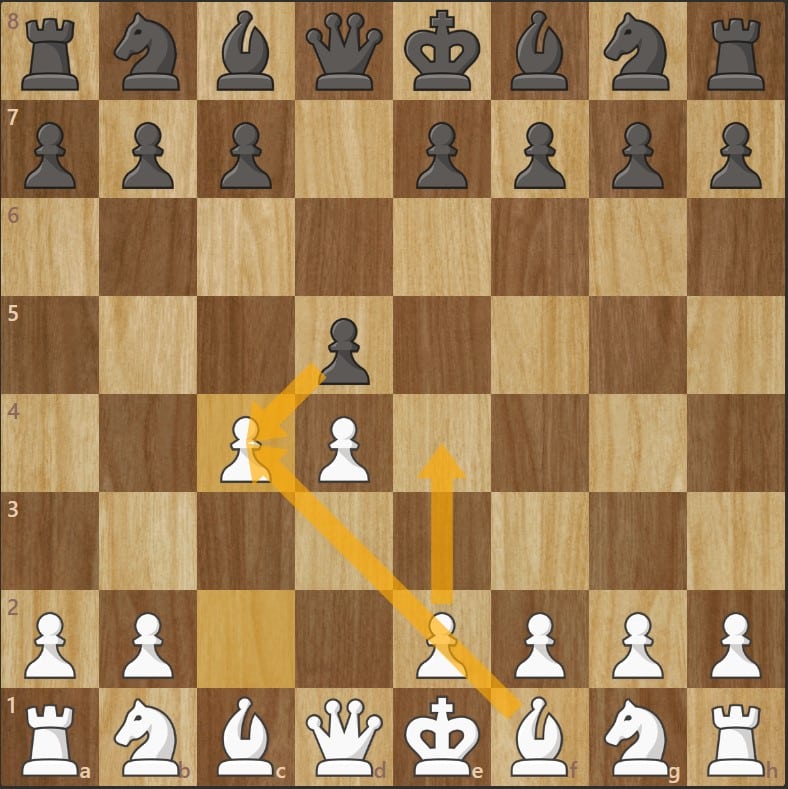
2. c4
- White intends to sacrifice (gambit) a flank pawn (the c-pawn) in exchange for a central pawn (the d-pawn), aiming to win the central battle quickly.
2… dxc4
- Black accepts the pawn, hoping to capitalize on this material advantage at the cost of central control.
3. e4
A natural move for White, who now has two pawns in the “magic square” (the four central squares of the board).
To avoid with Black
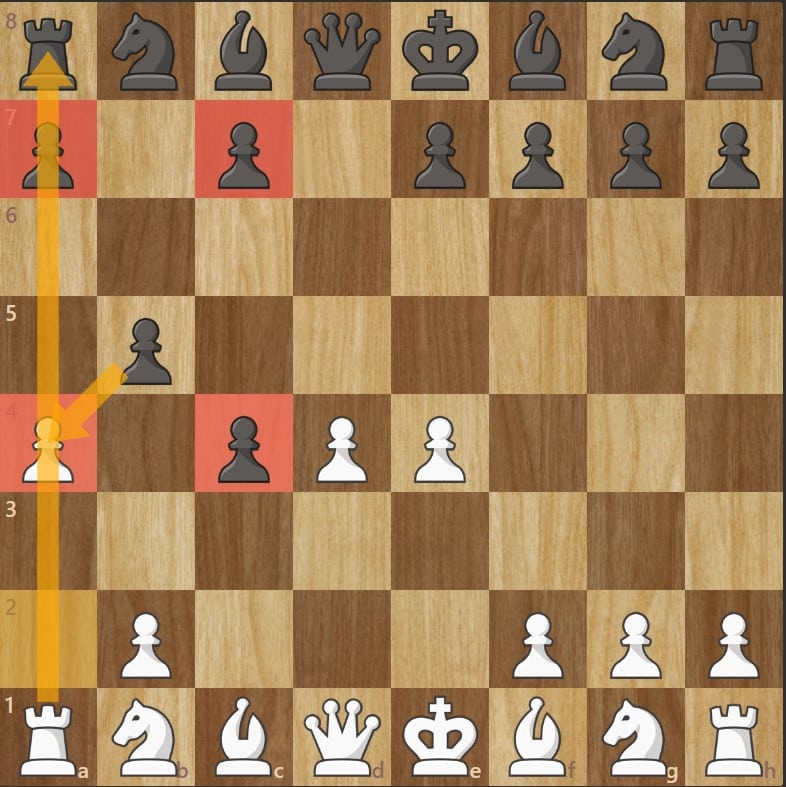
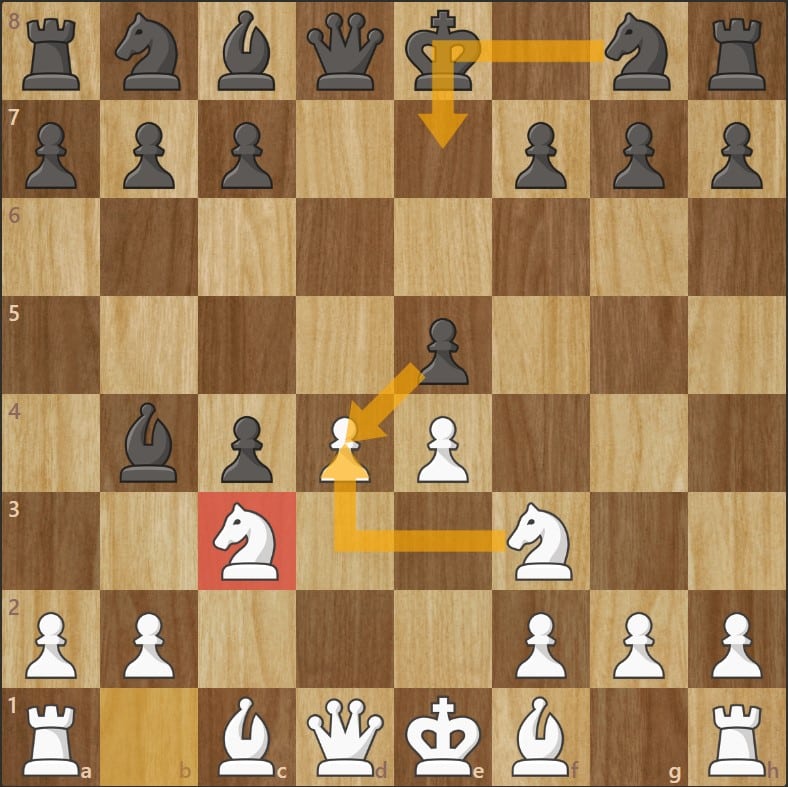
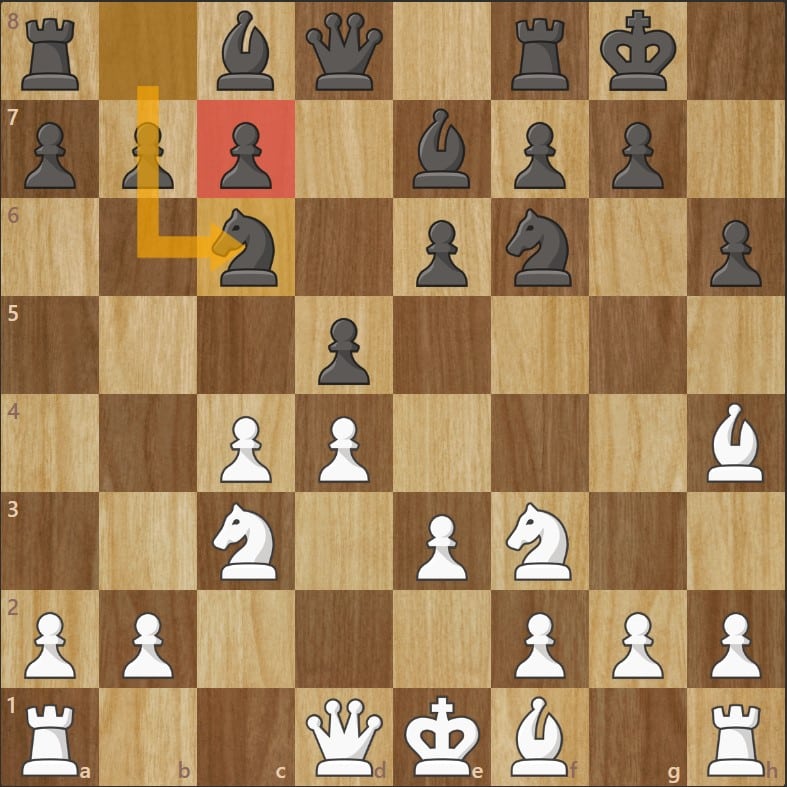
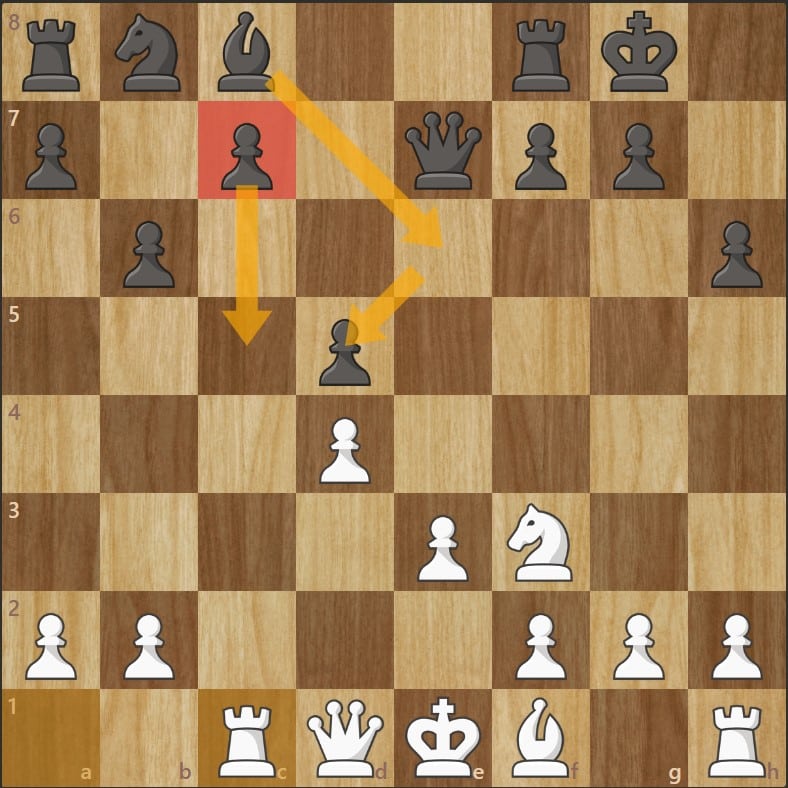
3… b5
- Black tries to defend the extra pawn. (MISTAKE)
4. a4
- White attacks the black pawn chain.
If Black captures (bxa4), they end up with four isolated pawns (shown in red in the diagram) which White will easily recover later in the game because they are extremely hard to defend.
Playing …a6 does not help, because the a-pawn is pinned by the rook on a1.
Defending with the c-pawn is no better, because after White develops the knight to c3, Black has no good response.
Contesting the center
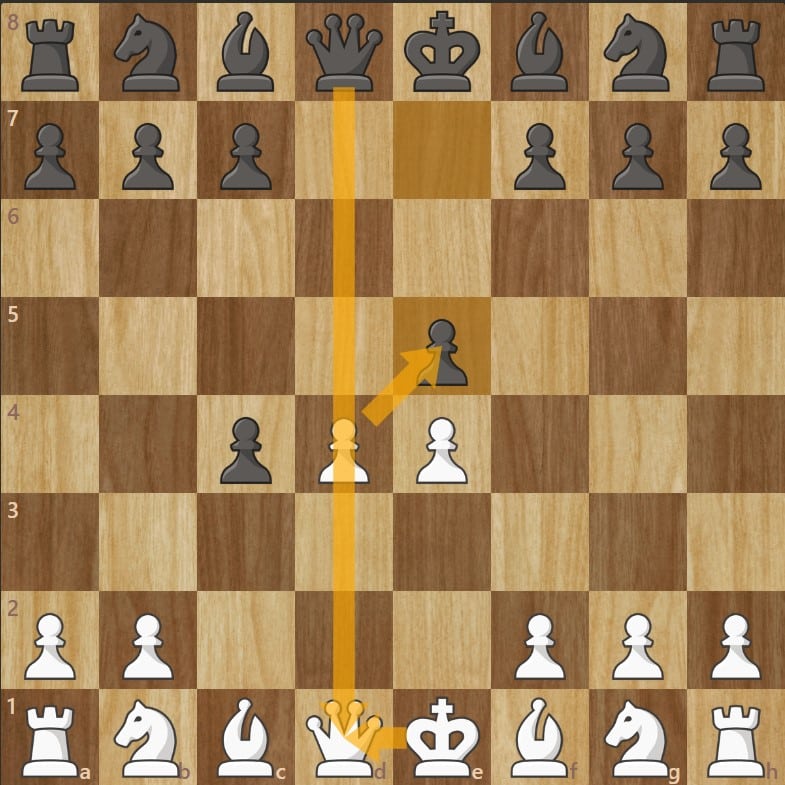
3… e5
- Black immediately challenges the center with e5.
- White cannot capture (dxe5), because after an exchange of queens, they would lose the right to castle, and Black could exploit the exposed white king to develop their pieces while gaining tempos.
White’s idea
4. Nf3
- Develops with tempo by attacking e5 and prepares castling.
4… exd4
- Black captures the d4 pawn: materially, they keep an extra pawn.
5. Bxc4
- White recovers the c4 pawn while developing the bishop: equal development, future pressure on d4.
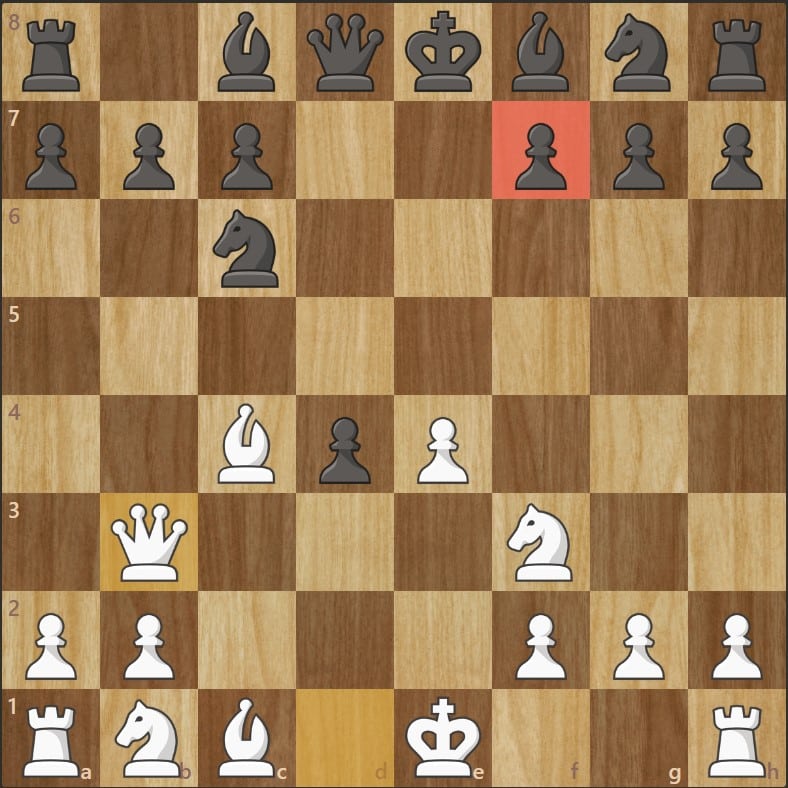
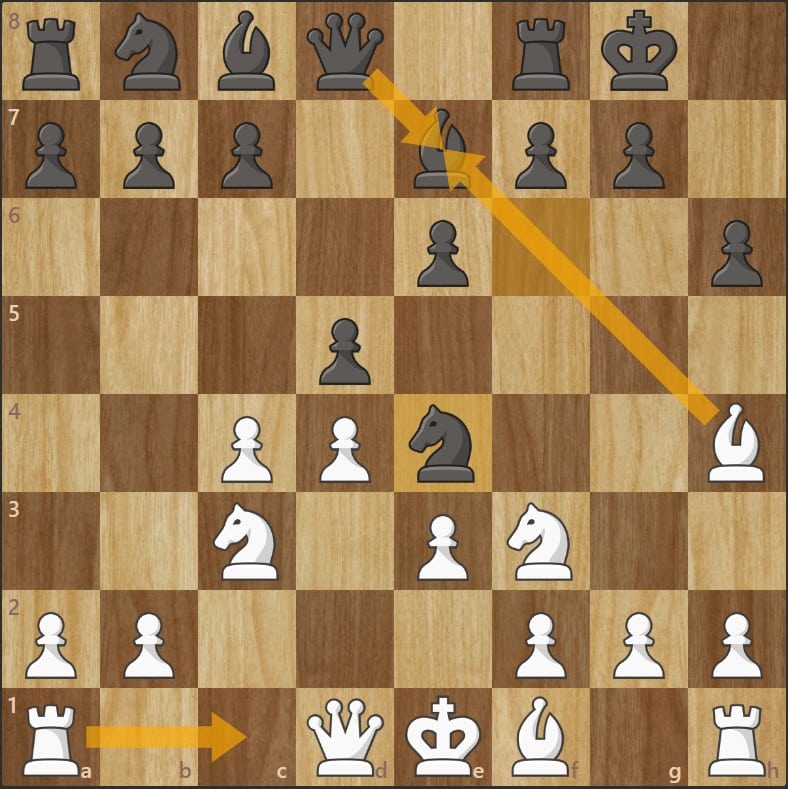
5… Nc6
- Natural development: targets e5/d4.
6. Qxb3
A multi-threat move:
attacks f7 and b7,
puts pressure on d5/d4.
A good move for Black
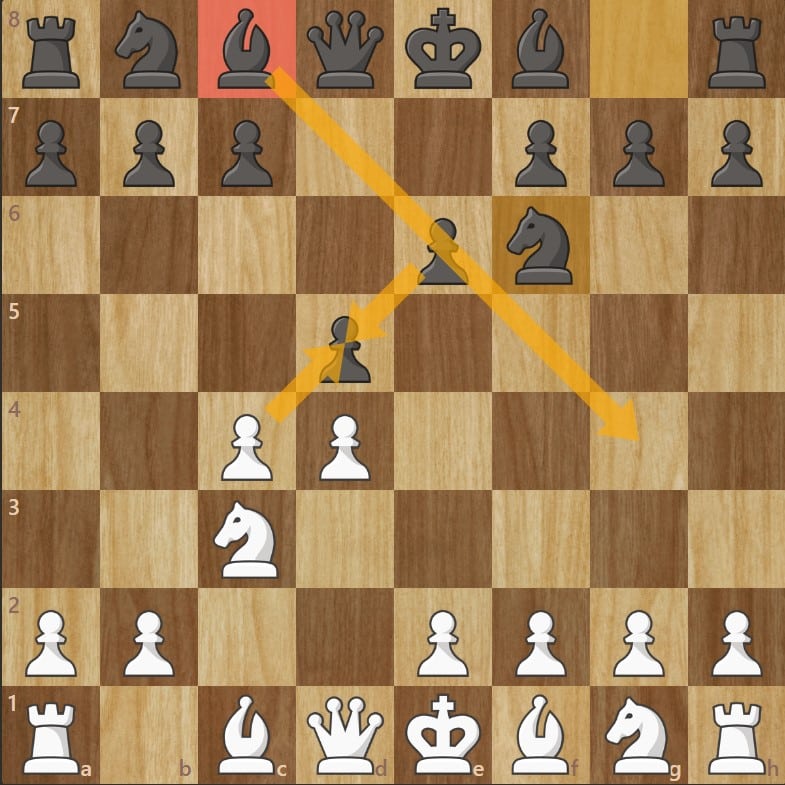
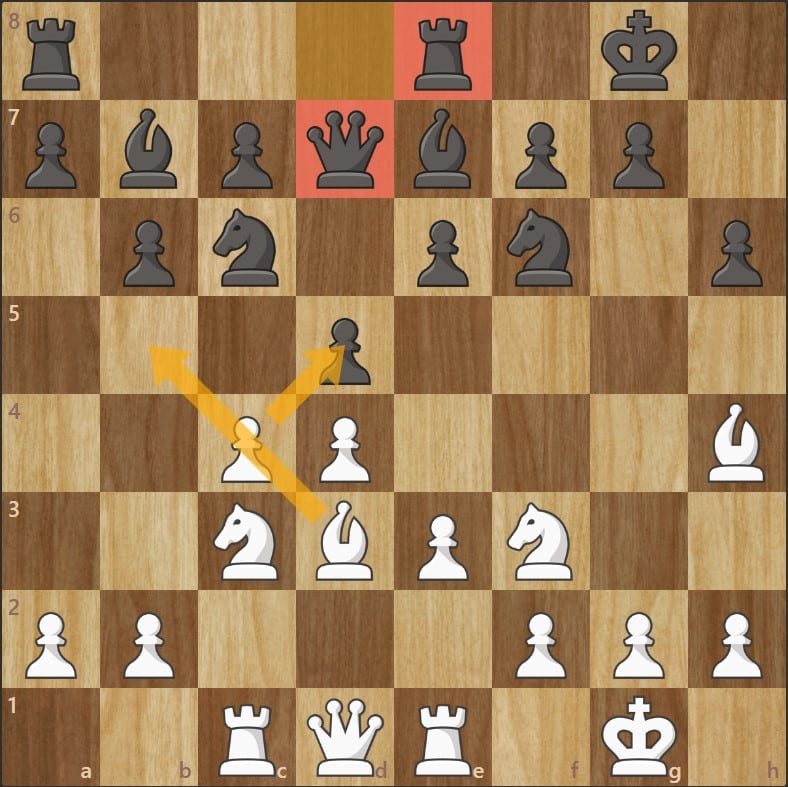
3. e4 e5
4. Nf3
4… Bb4+
- Black gives an intermediate check.
Idea: gain a tempo in development and later put pressure on the knight on c3.
5. Nc3
- The only logical reply (blocking the check without losing time).
It protects e4 and develops another piece.
But this knight becomes pinned, which may give Black tactical resources.
Possible balanced position
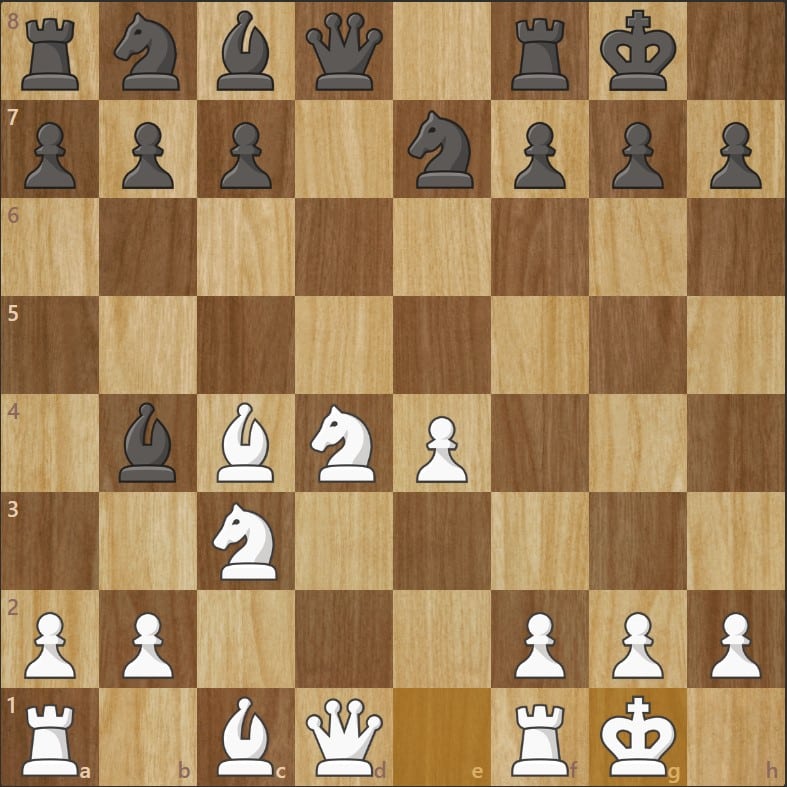
5… exd4
- Black decides to clarify the center immediately.
6. Nxd4 Ne7
- The knight recaptures on d4, keeping good central control.
- Black develops the knight cautiously to e7 (instead of f6) to avoid a future e5 push from White that would chase it away too early.
7. Bxc4 O-O
- White’s bishop finally recovers the c4 pawn → material is equal again.
- Black castles quickly: the king is safe and the position is healthy.
8. O-O
- White also castles.
Both sides leave the opening with harmonious development and a balanced position.
Queen’s Gambit Declined
Solid Black structure
1. d4 d5
2. c4 e6
- Black declines to capture on c4 in order to keep a solid central structure.
The idea: support d5 with e6 and prepare Nf6, Be7, and 0-0.
3. Nc3 Nf6
- White’s knight supports the center and prepares e4 or Nf3.
- Black develops the knight, puts pressure on e4, and prepares to castle.
This is the Orthodox Defense of the Queen’s Gambit Declined.
Black adopts a very solid setup: pawn on e6 + pawn on d5 → almost impenetrable structure.
White maintains more space and central control.
White’s typical idea is not to exchange on d5, so that the diagonal of Black’s light-squared bishop (c8) stays closed, delaying its development for as long as possible.
The logical continuation
4. Nf3 Be7
- Black plays Be7 rather than Bb4 to maintain a solid setup.
We now enter the Orthodox Variation of the Queen’s Gambit Declined.
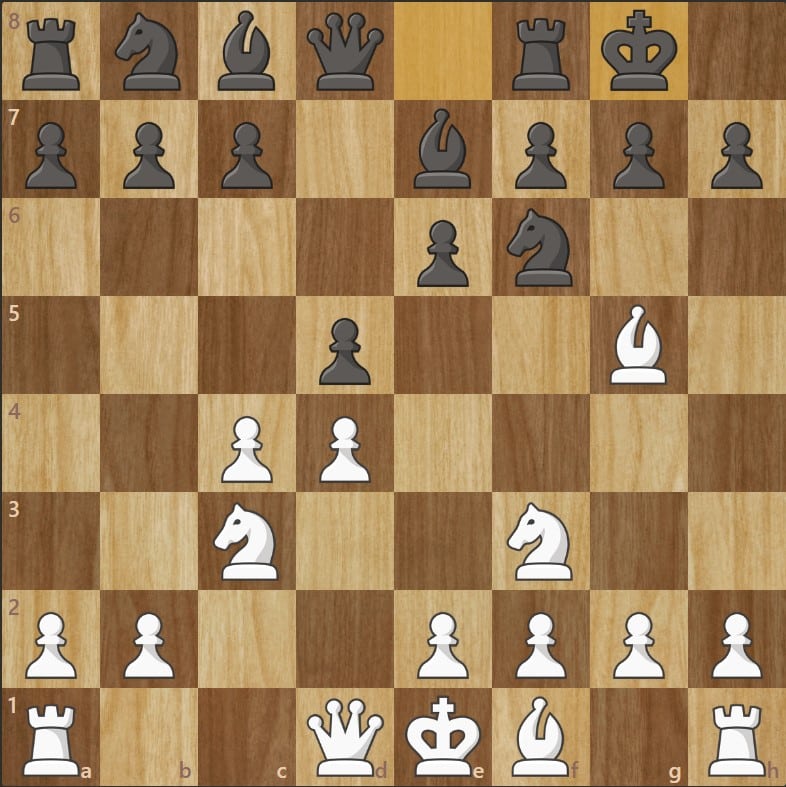
5. Bg5 O-O
- White develops the bishop to g5.
- Black castles without delay, bringing the king to safety and preparing …h6 followed by …dxc4 or …c5.
Position after 5 moves:
White :
Has developed pieces actively.
The pressure on Nf6 restricts Black (they cannot easily play …c5 or …e5).
Typical plans: e3, Rc1, Qc2, Rd1.
Black :
Has a very solid structure.
Main plan: break in the center with …c5 or exchange in the center with …dxc4.
The bishop on c8 is still passive for now.
Black : a mistake to avoid
6. e3
- White reinforces the center.
The c1-bishop will later come out to d3 or e2.
6… h6
- Black immediately challenges the pin on the knight on f6.
7. Bh4
- The bishop retreats but keeps pressure on Nf6.
Typical in this structure: the bishop waits for the right moment — it can later exchange on f6 or reposition to g3.
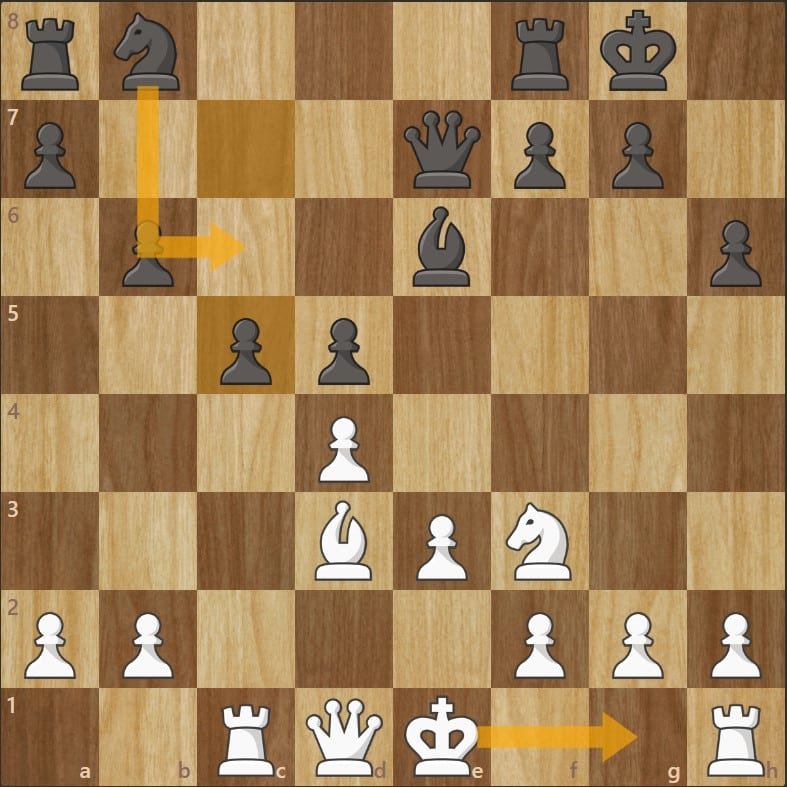
7… Nc6
A move that looks natural for Black at first glance.
But be careful — it blocks the c-pawn, which is Black’s key lever to:
challenge the center,
open the position,
increase the number of useful developing moves.
White punishes
Bd3 Re8
O-O b6
Rc1 Bb7
Re1 Qd7
cxd5 exd5
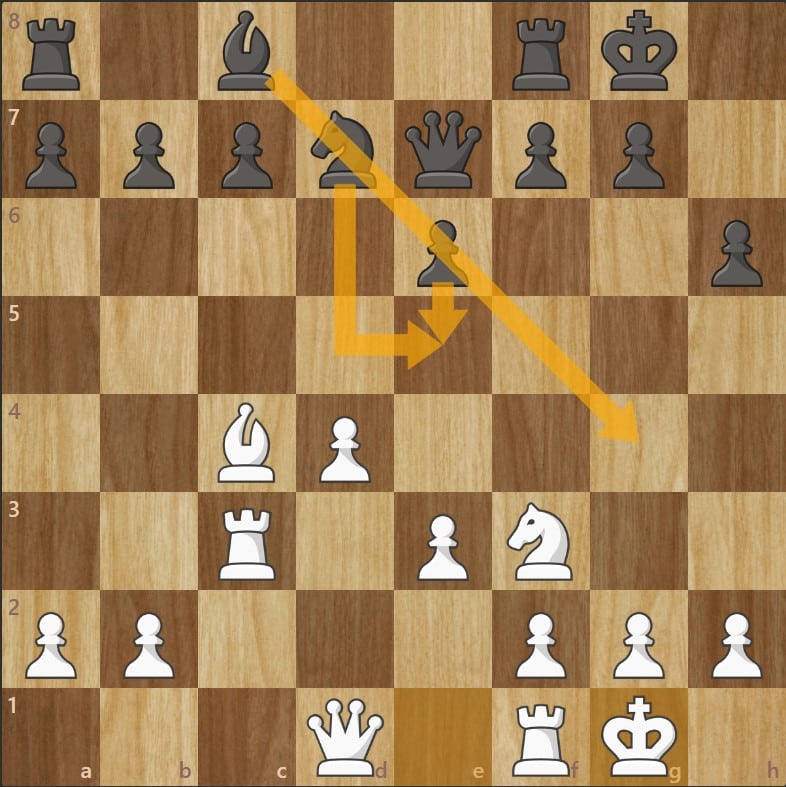
Bb5 Qe6
- The bishop attacks the queen, gaining a tempo.
- The black queen retreats to e6, stays active (eyeing h3 and e3), and defends the knight on c6.
e4
A push directly “into” the queen, seizing central control.
If Black captures on e4, White plays d5, forking the knight and the queen.
The correct development for Black (version 1)
7… Ne4
- Black opens the diagonal and forces the exchange of dark-squared bishops on e7.
8. Bxe7 Qxe7
- The bishops are exchanged.
9. Rc1
- White defends the knight while avoiding doubled pawns if
- Black captures on c3 (…Nxc3).
Important:
If White is tempted to take the knight on e4 with their knight from c3 — to double Black’s pawns on the e-file — Black can then consolidate with …f5 and possibly …g5.
This would give Black a fast kingside pawn storm, with very active pawns and strong attacking chances.
The correct development for Black (continued)
9… Nxc3
10. Rxc3 dxc4
11. Bxc4
After the exchanges on c3 and then on c4, Black is now ready to bring the knight out to d7, which will allow the …e5 pawn break.
11… Nd7
12. O-O e5
- White puts the king to safety.
- Black can now push the e5 pawn. This challenges the center and, most importantly, opens the diagonal so the bishop on c8 can finally become active.
The correct development for Black (version 2)
7… b6
- Black prepares …Bb7 and aims for a solid development.
8. cxd5 Nxd5
- White exchanges in the center.
9. Bxe7 Qxe7
- Exchange of the dark-squared bishop.
- Black now has less defensive control over the dark squares, but the queen becomes more centralized.
10. Nxd5 exd5
Another thematic move: White forces Black to accept an isolated pawn on d5.
Clear Black structure: static weakness (isolated d5 pawn) but dynamic potential.
11. Rc1
- Immediate pressure on the c-file, where the c7 pawn is weak.
Black’s idea is to push …c5 to achieve a harmonious pawn structure.
To do this, they must first develop the bishop to e6 in order to protect the d5 pawn.
The correct development for Black (continued)
11… Be6
- Black develops the dark-squared bishop.
12. Bd3 c5
- The white bishop targets h7 and supports the e4 square.
- Black plays the freeing move c5.
Objective: activate the center and open files to compensate for their structural weakness.
After this sequence, the position is equal and very playable for both sides.
- WARNING:
If Black plays c6 instead of c5, White can quickly take over and suffocate Black — especially with the move Ne5!
Variation without the exchange on d5
10. Bd3 Bb7
- The white bishop takes an active diagonal, pointing toward h7.
- Black develops their dark-squared bishop logically to b7.
11. O-O Nbd7
- White secures their king and connects the rooks.
- Black prepares the …c5 break.
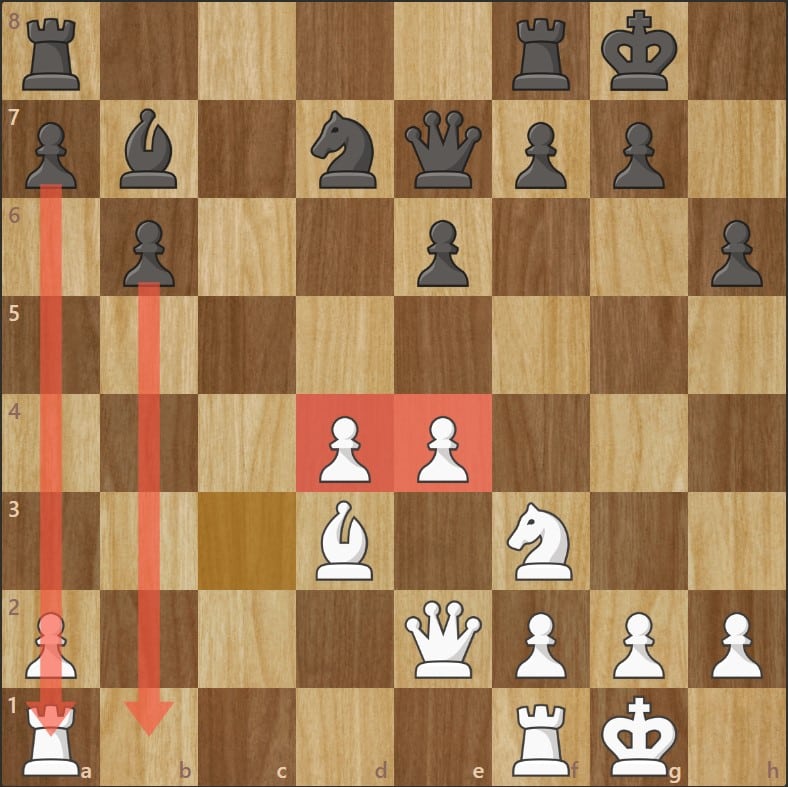
12. e4
- A thematic move: White uses their lead in development to gain space.
12… Nxc3
- Black exchanges in order to break White’s structure.
By removing the knight on c3, they reduce the pressure on d5.
13. bxc3 c5
- White recaptures with the b-pawn, opening the b-file for their rooks.
- Black immediately plays …c5 to activate their isolated pawn.
14. Qe2 cxd4
15. cxd4
After this sequence, White holds the center, but Black has managed to free enough space to activate all their pieces properly.
Black also holds a queenside pawn majority (a- and b-pawns vs. White’s lone a-pawn), which may become a long-term asset later in the game.