They obtain rapid development and clear lines for their pieces.
It is a straightforward, direct opening with no hidden maneuvers.
Strengths
Open center: encourages rapid development and active piece play.
Ideal for players who enjoy clear tactical positions.
A relatively simple and intuitive theoretical framework.
Can surprise Black players who are used to more closed systems.
Weaknesses
If Black responds accurately, White only obtains a small advantage.
The open center can expose the white king if development is neglected.
Requires good understanding of exchanges and tempo, as every move matters in this type of position.
Black Exchanges the Knights
Starting position
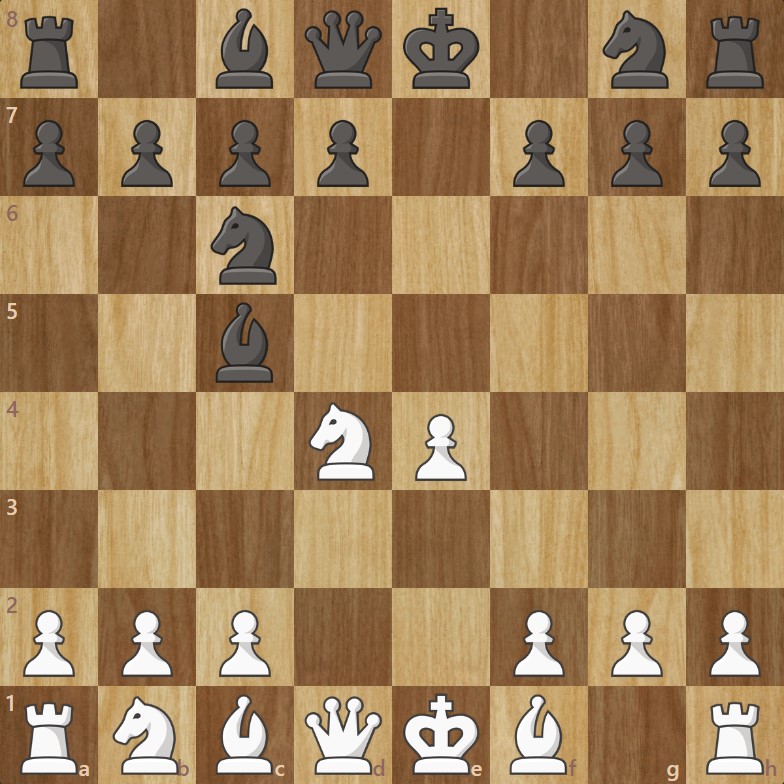
1. e4 e5
2. Nf3 Nc6
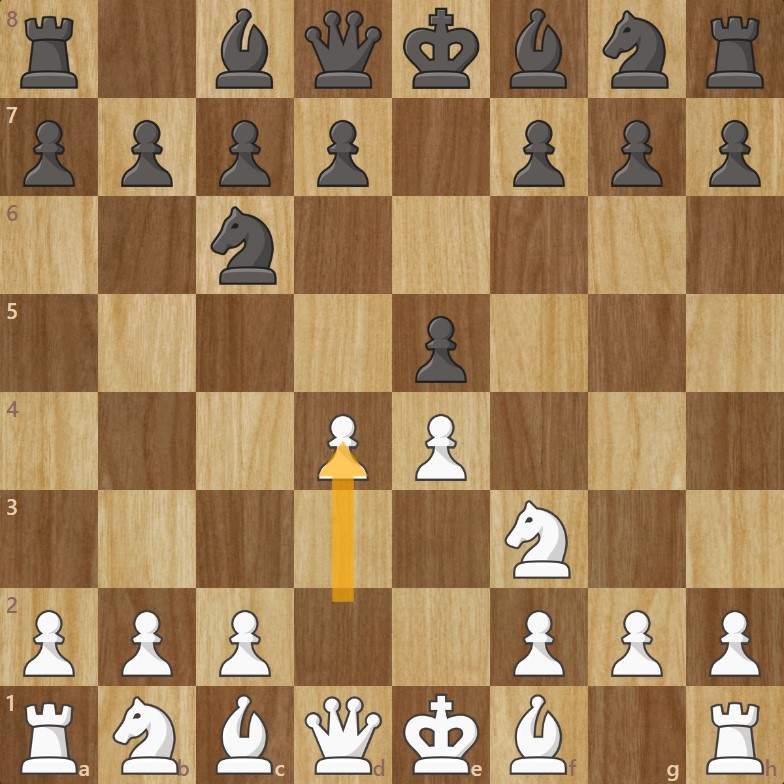
3. d4
White immediately stakes a claim in the center.
This is the typical position of the Scotch Opening, and we will first look at what happens when Black captures twice on d4.
It is a mistake — but understanding why is important, so you can punish it when your opponent goes wrong.
Black’s Mistake : Exchanging the Knights !
3. d4 exd4
The first capture—logical and theoretically sound.
4. Nxd4 Nxd4
White recaptures the pawn.
Black captures the white knight. (Mistake!)
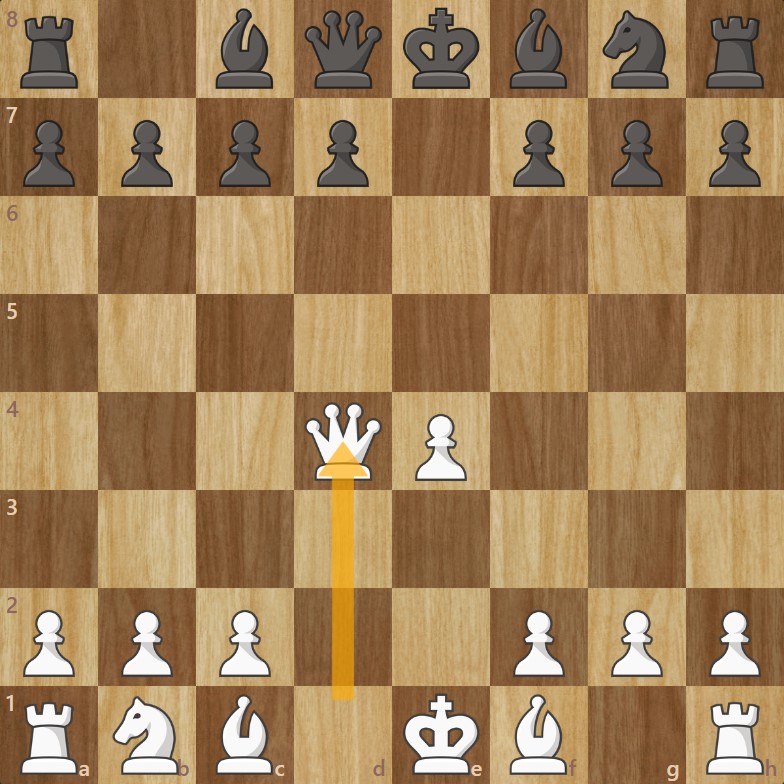
5. Qxd4
White recovers the knight, keeping material equality.
The problem for Black is that none of their pieces are developed, while the white queen is now centralized, giving it influence over many squares.
Usually, bringing the queen out too early is discouraged because it allows the opponent to attack it while developing their own pieces. But here, none of Black’s pieces can chase the white queen effectively without compromising their harmonious development.
Black’s Attempted Counterattack
5… c5
Black decides to attack the queen by advancing a relatively central pawn. This move may look like a good idea, but it actually creates a structural weakness, because…
6. Qd3
White repositions the queen while maintaining strong pressure on the center.
It becomes clear in this position that Black cannot push the d5 pawn, as the square is controlled twice by White.
Playing d6 would slow down the development of the dark-squared bishop, and it would also turn the d6 pawn into a backward pawn (unable to be defended by another pawn and stuck behind its neighbors). It would become an easy target for White’s pieces.
For all these reasons, Black should avoid …c5 in this position!
Another Black Mistake : Developing the Knight to f6
5… Nf6
Black decides to develop a piece, starting with this knight… Mistake!
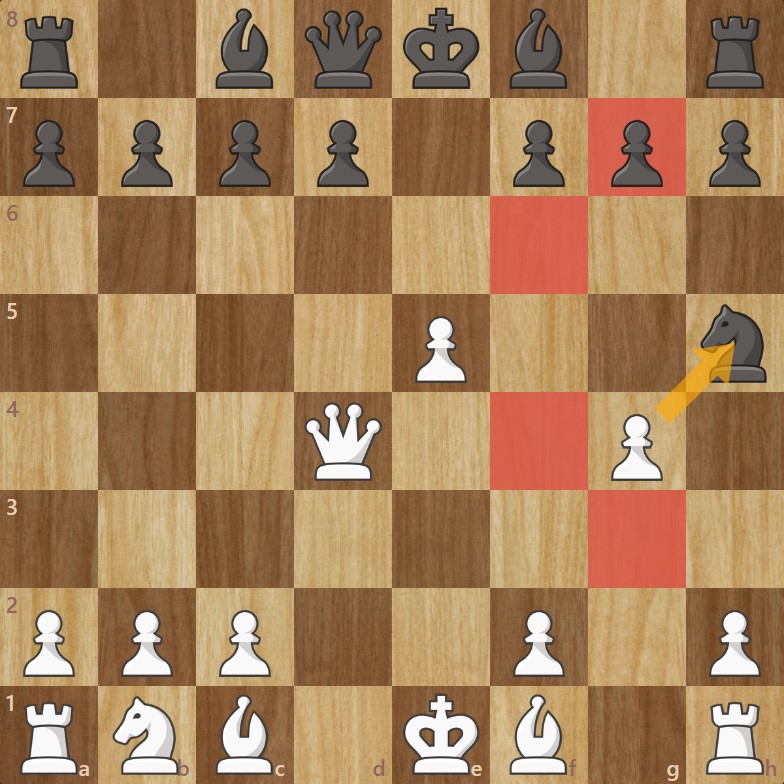
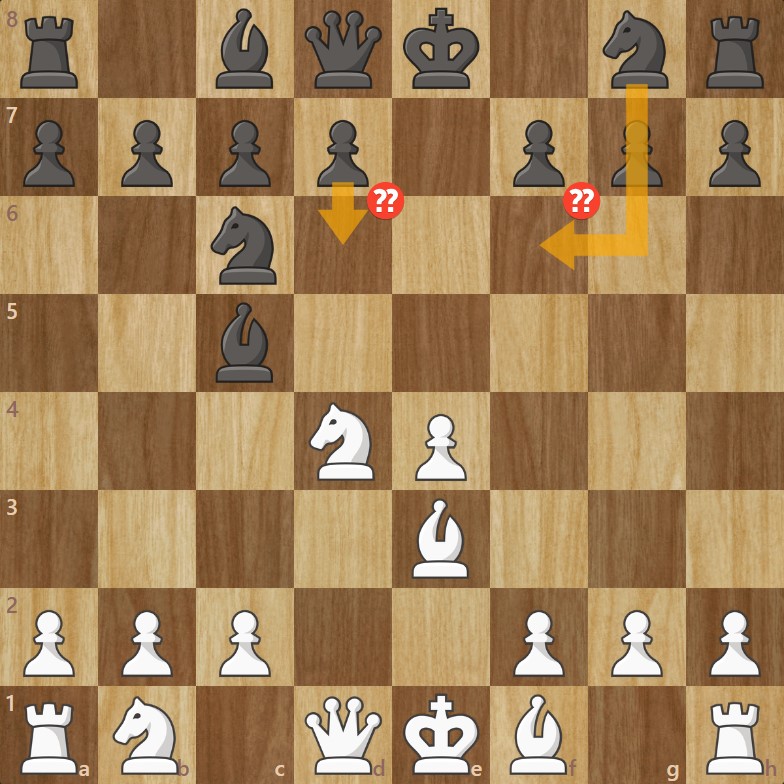
6. e5 Nh5
White takes even more space in the center while simultaneously attacking the knight.
The black knight tries to escape…
7. g4
…but in vain — it now has no more squares available.
White’s advantage is clear enough to secure the win, as long as they remain focused!
If Black Develops Without Major Mistakes
5… d6
6. Nc3 Nf6
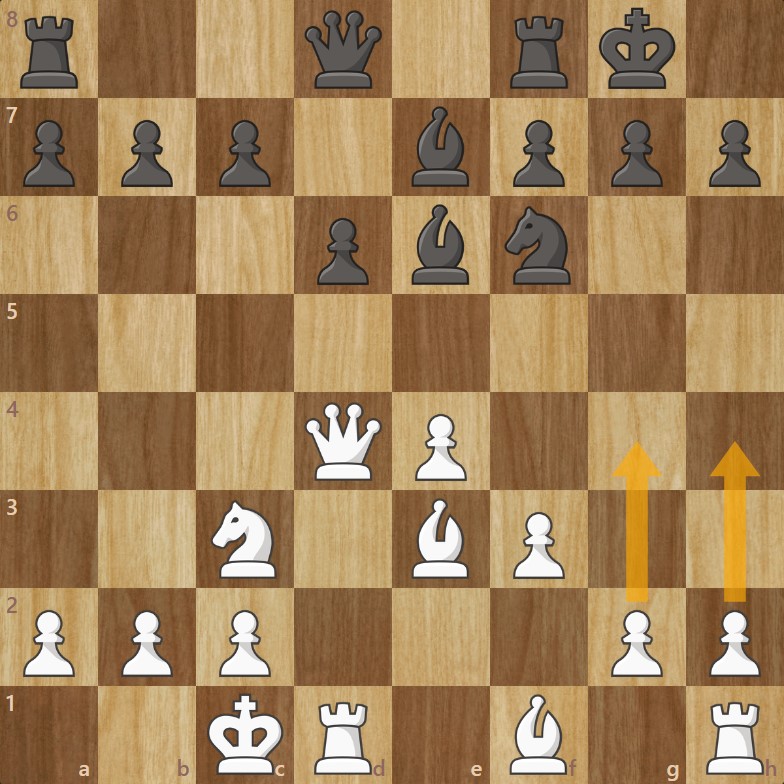
7. f3 Be7
8. Be3 O-O
9. O-O-O Be6
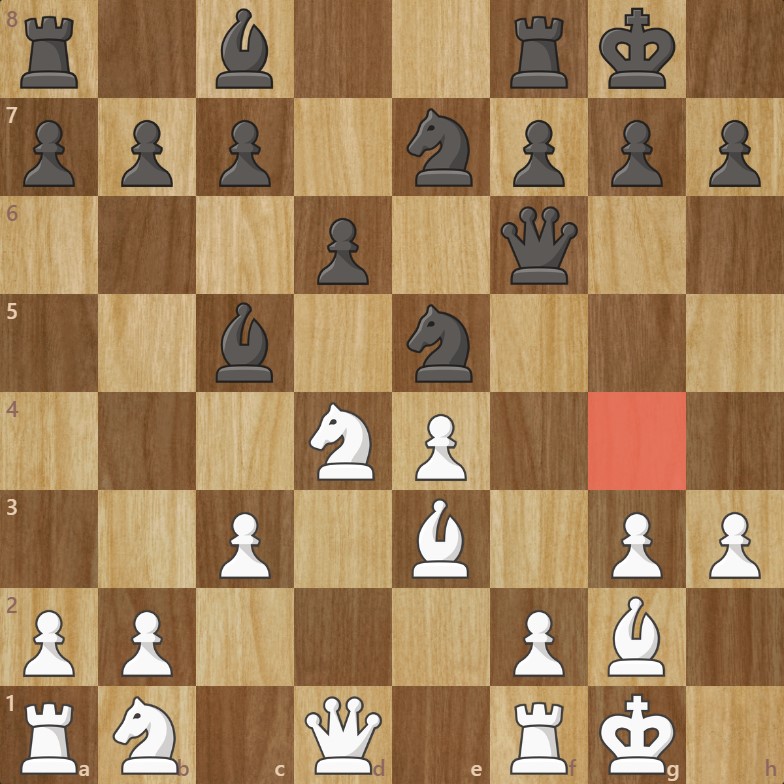
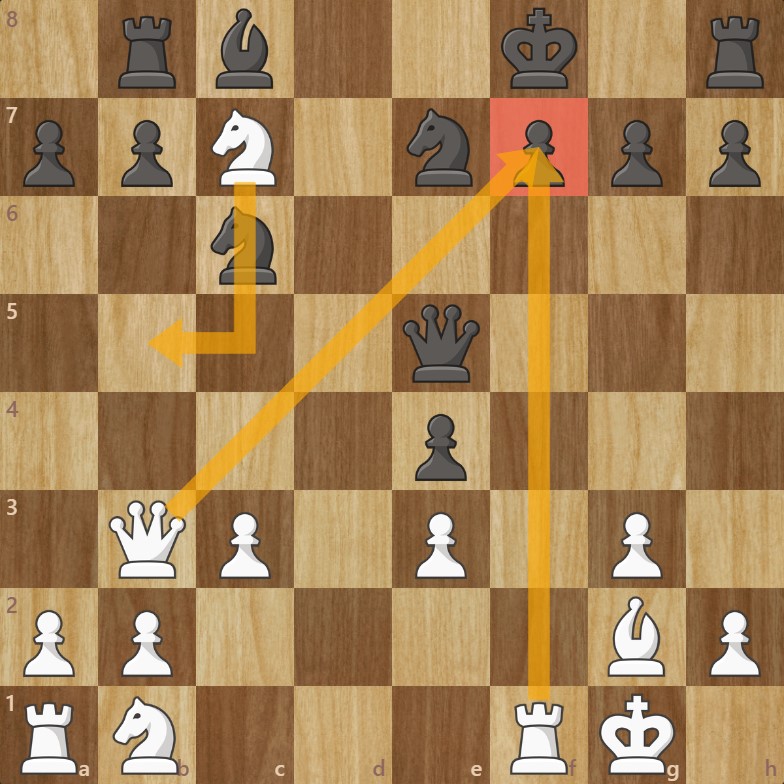
After this sequence of development (see diagram), with no particular mistakes from either side, we reach a position where the kings have castled on opposite wings.
In such positions, the player who launches the first attack on the opponent’s king is often the one who wins. And it becomes immediately clear from the diagram that White will have the initiative in the attack:
The bishop and queen are already aiming toward the black king;
Next will come g4 and h4, and the pawn storm will eventually overwhelm Black’s defenses.
The Main Line
One Capture, Not Two !
In this case, instead of exchanging knights and allowing White to centralize their queen, Black exchanges the pawn:
3… exd4
4. Nxd4
Black then decides to develop the bishop to c5, creating a double attack on the knight on d4.
White’s Response
5. Be3
White protects the knight on d4 a second time and can now prompt Black into making two different mistakes, which we will detail next.
First Possible Black Blunder : Developing the Knight
5… Nf6
This developing move may appear logical, but we must remember that the bishop on c5 is undefended. White’s goal will be to exploit this weakness.
6. Nxc6
White wins a knight and simultaneously threatens the black queen.
This forces Black to recapture the knight on c6, leaving the bishop on c5 completely exposed.
After this sequence, White is a full bishop ahead after only seven moves!
Second Possible Black Blunder : d6
5… d6
6. Nxc6 bxc6
The knights are exchanged.
7. Bxc5 dxc5
The bishops are exchanged.
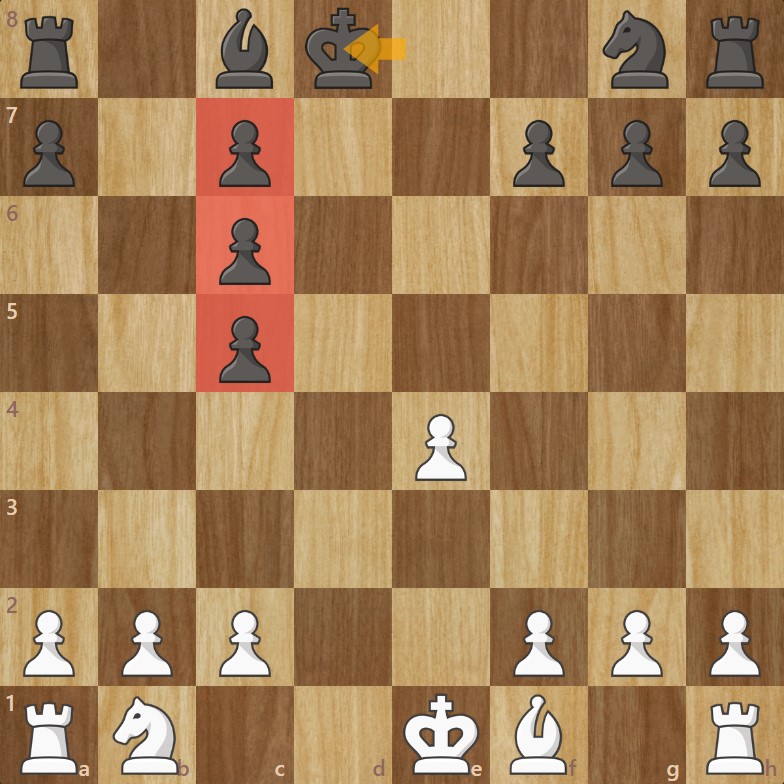
8. Qxd8+ Rxd8
The queens are exchanged.
The resulting position is disastrous for Black. They end up with tripled pawns (very weak) and a king forced into the center in an extremely open position !
The Right Move for Black
5… Qf6
Black develops the queen and adds a third attacker on the white knight on d4.
6. c3
White consolidates their position.
At this point the position is very balanced, but White should try to make use of their space advantage provided by the e4 pawn.
End of the Opening Phase
6. c3 Ne7
7. g3 O-O
8. Bg2 d6
9. O-O
After this sequence, both sides have completed their setup. The kings are safe, and the position appears stable. However, the computer evaluation still gives +0.5 for White.
Let’s now look at the plans White can use to try to convert this positional advantage.
A Possible Black Attack — and How to Stop It !
9… Ne5
Black centralizes the knight, and this threat should not be taken lightly!
White may be tempted to play f4 to chase the knight away — but forget this move, it loses the game for White.
Why? Because in this position, it is crucial not to allow the g4 square to become accessible to the black knight.
If White plays f4, the situation becomes even worse: not only does the move give Black access to g4, but it also opens the dark-squared diagonal directly toward the white king.
10. h3
This is the correct move for White!
Black Takes Space
10… Nc4
Black continues to capitalize on their piece activity, and this move simultaneously targets the b2 pawn and the bishop on e3.
11. Bc1
White retreats to protect everything.
White’s idea will once again be to find the right moment to push the d5 pawn. To achieve this, they will try to bring a rook to d1 to support the d5 advance.
Despite being somewhat cramped in their own camp, White will still be able to counterattack !
White’s Counterattack !
12. b3 Ne5
White chases the knight on c4. Black retreats the knight to e5.
13. Kh2
The purpose of this move is to move the king off the dark-squared diagonal, where it was aligned with the bishop on c5.
The king will now actively participate in the defense—and unusually early in the game—supporting the g3 and h3 pawns.
White’s pawn storm can now begin to advance against the black kingside, gaining space in a very secure and systematic way.
The White Pawn Storm
13. Kh2 d5
14. f4 Nc6
15. e5 Qg6
16. g4
After this sequence, a full-scale pawn storm is about to crash down on Black’s kingside. Each pawn push gains tempo by attacking a black piece, forcing it to move again.
Notice how close the black queen is to being trapped. The slightest inaccuracy from Black, and their entire kingside position will collapse!
The Main Line : Black Pushes d5
If Black Pushes d5 at the Right Moment…
6. c3 Ne7
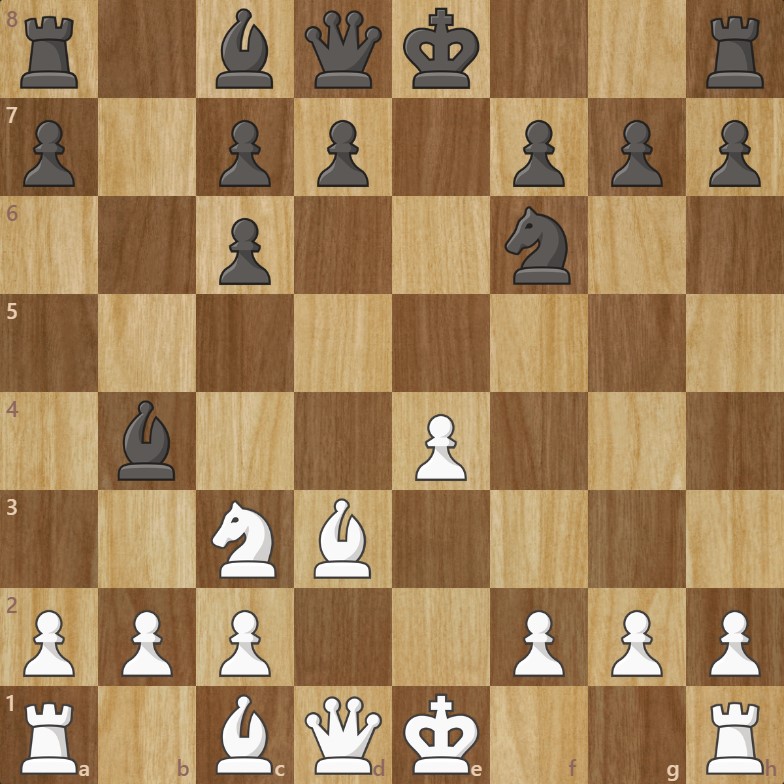
7. g3 d5
This is the key moment when Black must push d5; if they fail to do so now, they will no longer have the opportunity.
We reach the following position (see diagram).
White's answer
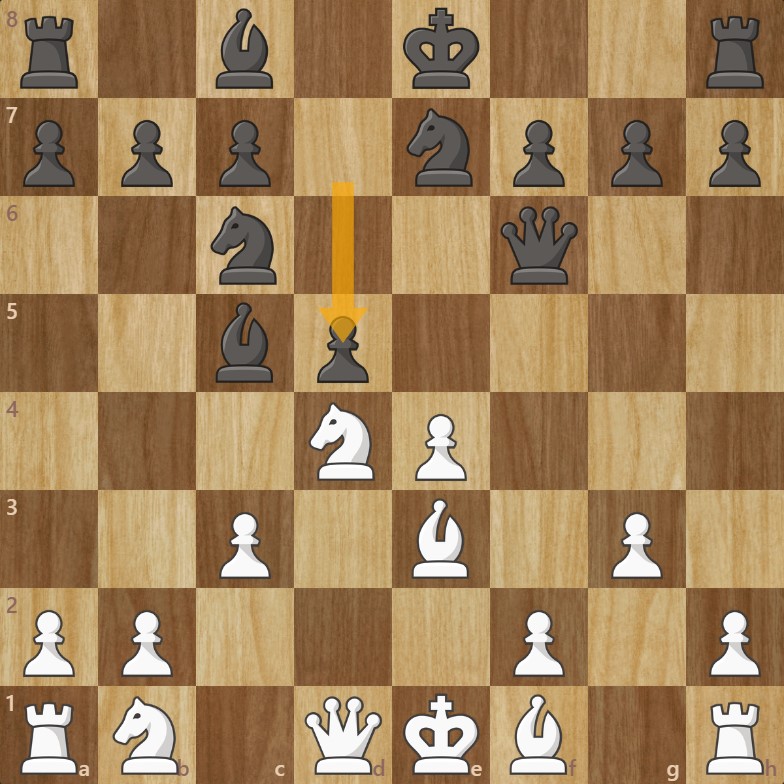
8. Bg2 dxe4
9. Nb5
White now threatens a fork on the king and the rook. A second problem for Black: the bishop on c5 is unprotected !
At this stage, Black can very easily get confused and hand you a clear advantage — for example by retreating the bishop to d6 or b6, both of which lose material.
The Only Viable Move for Black
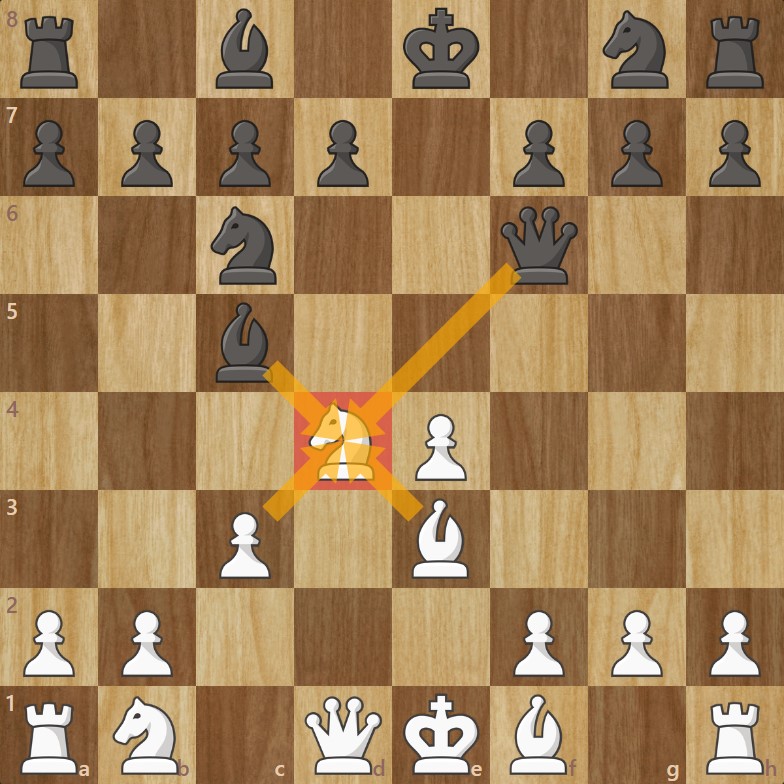
9… Bxe3
This move potentially trades the bishops on e3, but it also creates a checkmate-in-one threat against White.
10. Nxc7+ Kf8
The famous fork!
Black is in check, which means they cannot deliver mate. Additionally, the d-file is controlled by the white queen, preventing Black from blocking.
The black king is forced to move to f8.
White : The Importance of Move Order
11. O-O Rb8
It is important for White to castle first and not rush to capture the bishop.
Black saves the rook and leaves the bishop on e3.
Black’s idea is then to try to trap the white knight on c7, aiming to recover the lost material.
White Threatens Mate and Saves the Knight
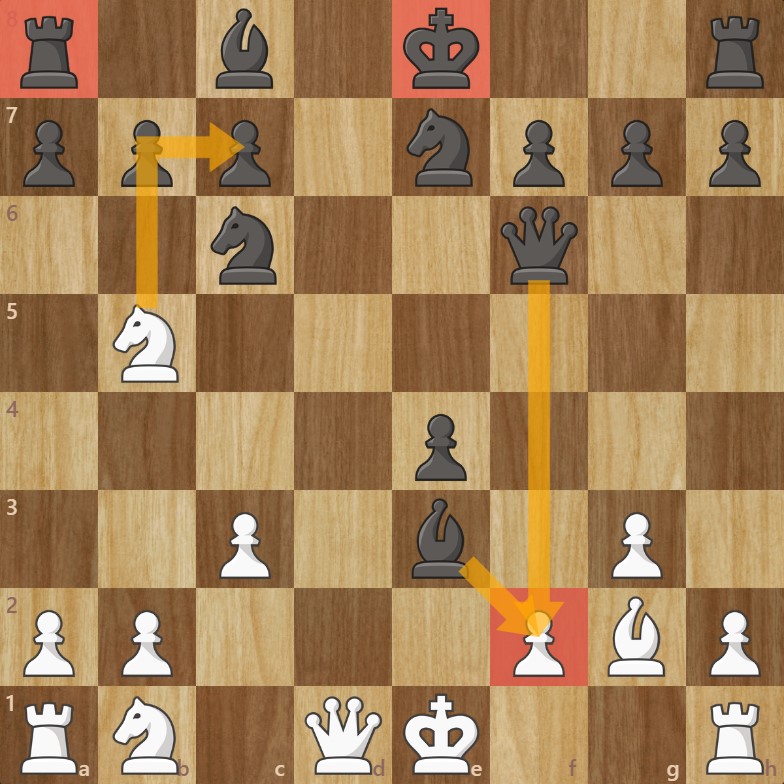
12… Qe5
Black moves the queen out of alignment with the rook and attacks the white knight, cutting off all its escape squares.
13. Qb3
A double-purpose move ! The queen threatens checkmate on f7 and simultaneously prepares a retreat square for the knight (b5).
In this position, the game remains playable for both sides. However, White’s position is certainly easier to handle: Black is uncastled, and coordinating the rooks will be much more difficult.
The Four Knights Variation
The four horsemen (Kill em all edition)
Another alternative (instead of Bc5) is Black’s intention to put pressure on the e4 pawn.
1. e4 e5
2. Nf3 Nc6
3. d4 exd4
4. Nxd4 Nf6
5. Nc3
White’s Response
5… Bb4
Black attacks the knight on c3, the only defender of the e4 pawn.
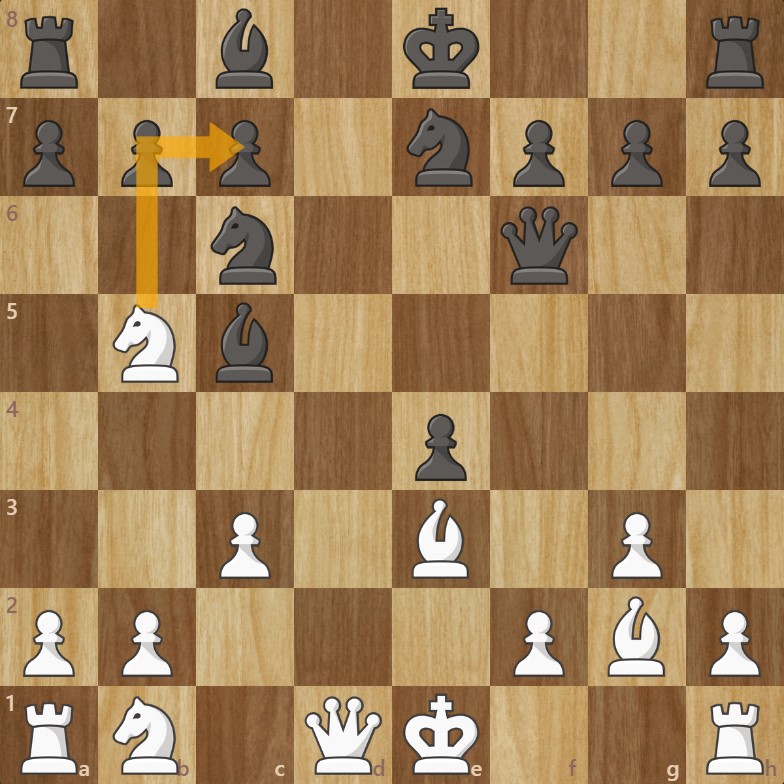
6. Nxc6 bxc6
White captures the knight, simultaneously threatening the black queen. It is important to make this move first: if White instead develops the bishop to d3 immediately, the knight on d4 would no longer be protected by the queen.
Black recaptures the knight.
7. Bd3
The white bishop can now come out to defend the e4 pawn !
The Bishop Pair : Too Strong
7. Bd3 Bxc3+
8. bxc3 d5
9. exd5 cxd5
In this fairly “logical” sequence, Black tries to blow up the center with d5 (which is indeed the move they typically aim for in the Scotch). They also end up doubling White’s pawns.
However, the position is now very open, and in open positions the bishop pair is vastly superior to the knights. As a result, White has a clear and significant advantage in this position (+2.05).
You will very often reach this structure as White up to around 1700–1800 Elo — make the most of it !
Common Alternative Position
In this position, White will also not want to allow Black to enjoy the benefits of the bishop pair.
The knights on c3 and f6 can therefore sleep soundly — at least in principle ! But be careful of potential pins.
An Attacking Idea for White
In this type of position, both kings are safe and the minor pieces have been developed.
Both sides have completed their development correctly.
White’s next idea can be to bring the knight over to the kingside (see diagram).