

Italian opening
• Control the center with e4 and Nf3.
• Quickly develop the bishop to c4, targeting the vulnerable f7 square.
• Prepare a harmonious development (Nc3, d3, O-O).
• Encourage an open game with early exchanges and active piece development.
Strengths
• Simplicity and clarity: ideal for learning fundamental principles.
• Direct pressure on f7, the most sensitive weakness in Black’s position.
• Allows fast and natural piece development.
• Offers White the possibility to choose :
• a calm and positional game (with d3, O-O),
• or a very sharp one (gambits, early d4 push).
Weaknesses
• Black can equalize fairly quickly if they know the correct replies (…Nf6 followed by …Bc5 or …Be7).
• Less strategic depth than the Ruy Lopez: sometimes considered less ambitious at the highest level.
• Aggressive variations (such as the Giuoco Piano or the Evans Gambit) can be double-edged: a single mistake can cost the game.
Classic patterns
The first moves
1. e4 e5
- White immediately occupies the center.
- Black responds symmetrically.
2. Nf3 Nc6
- The white knight attacks e5.
- The black knight defends this central pawn.
3. Bc4
- A characteristic move of the Italian Game.
The bishop directly targets f7, the weakest point in Black’s position.
White develops their light pieces harmoniously.
3… Nf6
- Black develops the knight, attacking the e4 pawn.
This invites direct confrontation.
Playing the pin
4. d3 Bc5
- White reinforces the center (protecting e4, preparing Nc3 and O-O).
- The black bishop develops to c5, targets f2, and comes out naturally.
We are in a very classical Italian line (Giuoco Piano with …Nf6).
5. Nc3 d6
- The white knight supports e4 and prepares d4 under good conditions.
- The black pawn on d6 strengthens e5 and opens the diagonal for the c8 bishop.
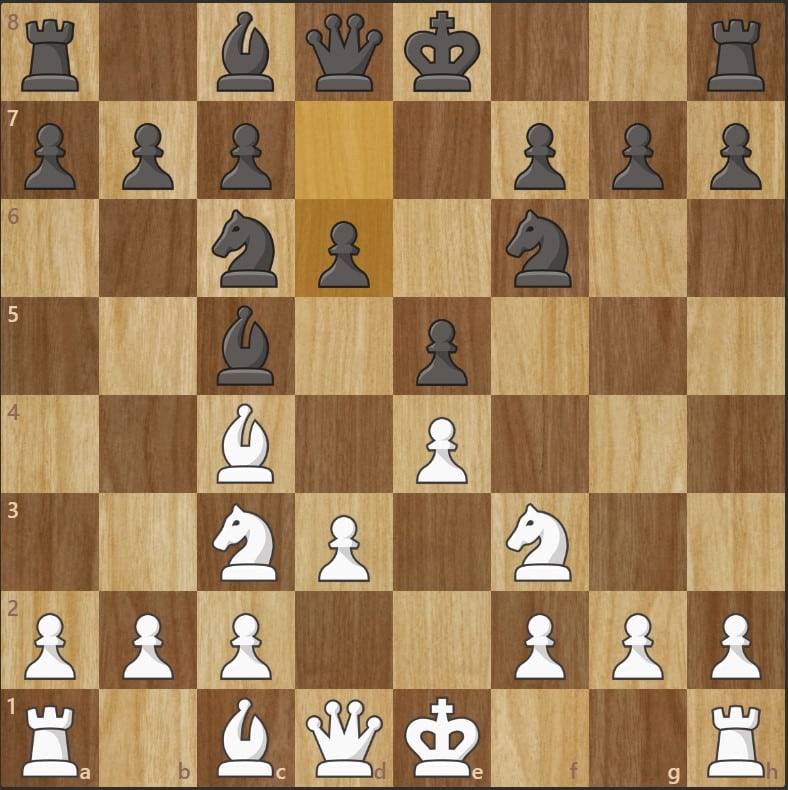
6. Bg5
- White pins the knight on f6 to the black queen.
The first threat
6… h6
- Black immediately challenges the pin with …h6.
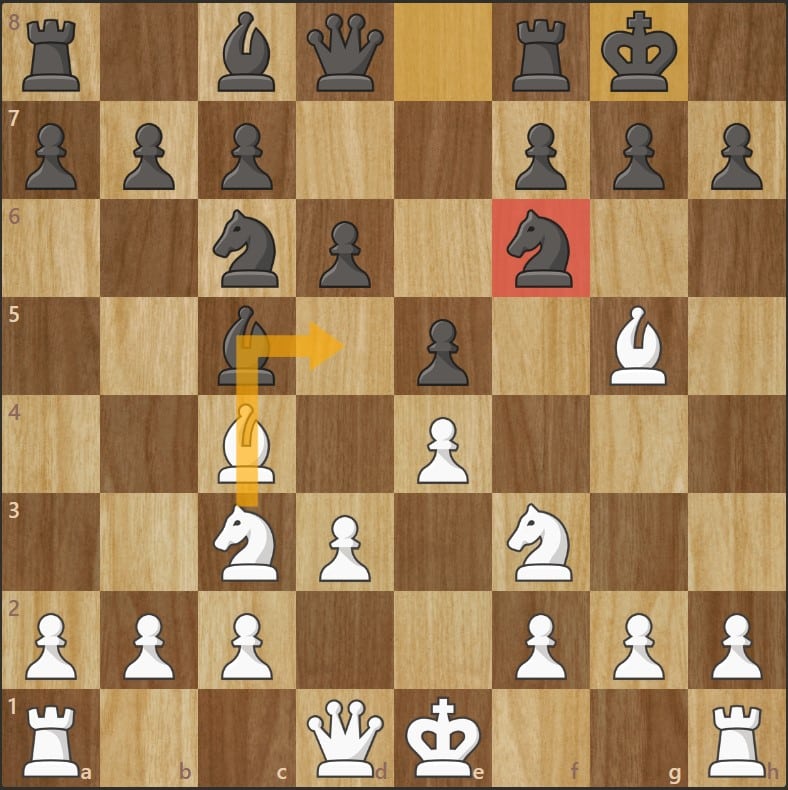
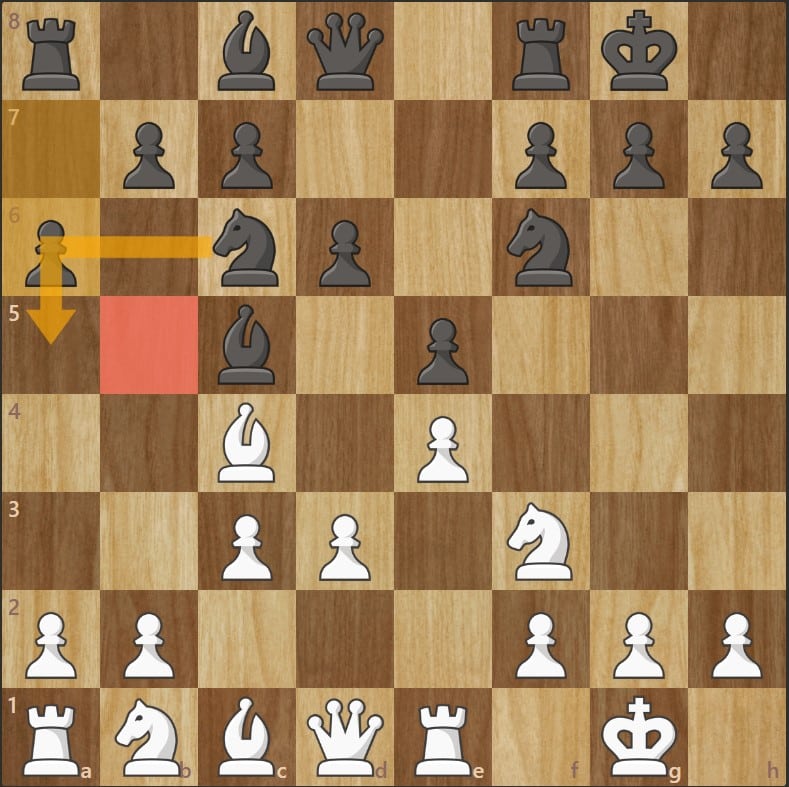
7. Bh4
White wants to keep the initiative and maintain strong pressure on the knight on f6.
Be careful not to get tangled here, as Black can neutralize the threat and counter with a future material advantage. (see diagram 4)
The lure of the sacrifice
7… O-O
- Black castles quickly, accepting to live with the pin.
It looks solid, but it allows tactical themes.
8. Nd5
- The knight jumps into the center, attacking the f6 square.
It’s an aggressive move that takes advantage of the pinned knight on f6.
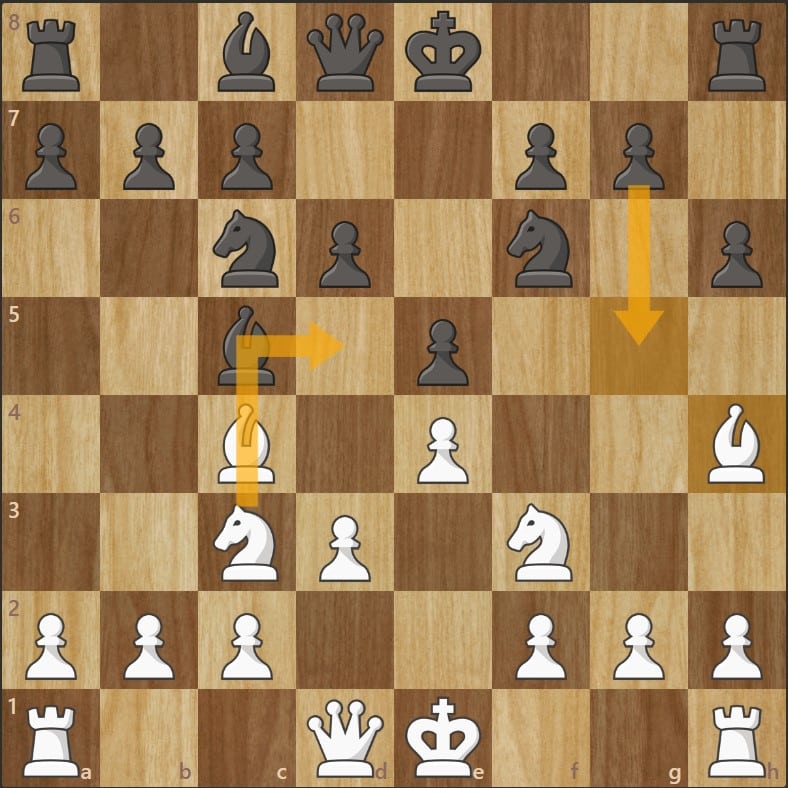
8… g5
- Black decides to chase the bishop on h4 immediately.
But this move severely weakens their kingside, and it invites White to sacrifice !
Punishing Black’s mistake
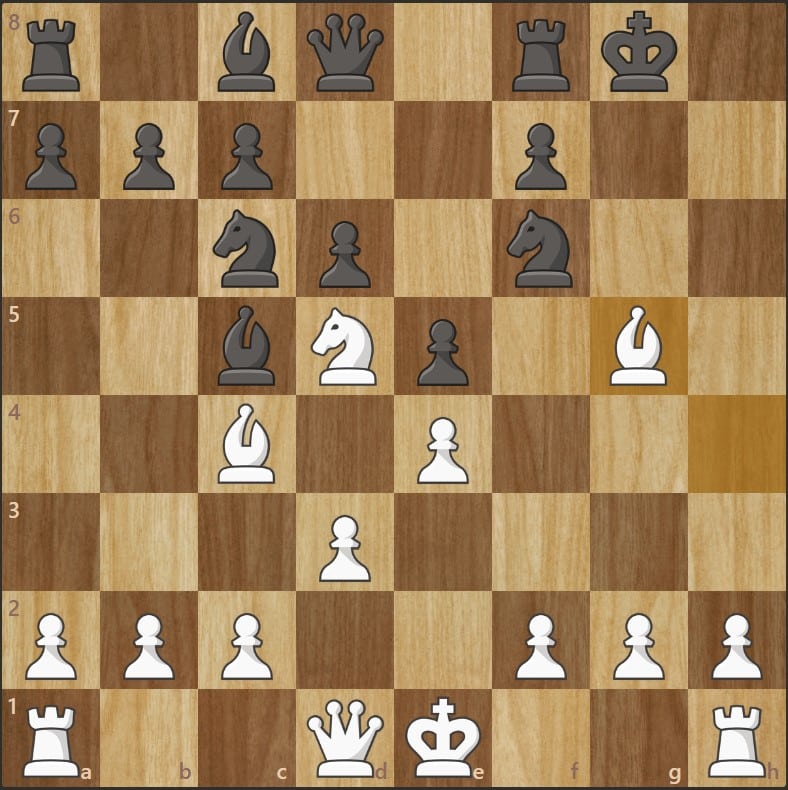
9. Nxg5
- White sacrifices the knight!
Idea: exploit the pin and open lines against the black king.
9… hxg5 (BLACK’S MISTAKE)
- Black accepts the sacrifice.
Materially they gain an advantage, but their pawn structure around the king is shattered.
10. Bxg5
- The bishop recaptures, exploiting the h4–d8 diagonal.
Immediate threat: Bxf6 followed by Qh5, leading to direct attacks on h7 and g6.
The position is winning for White.
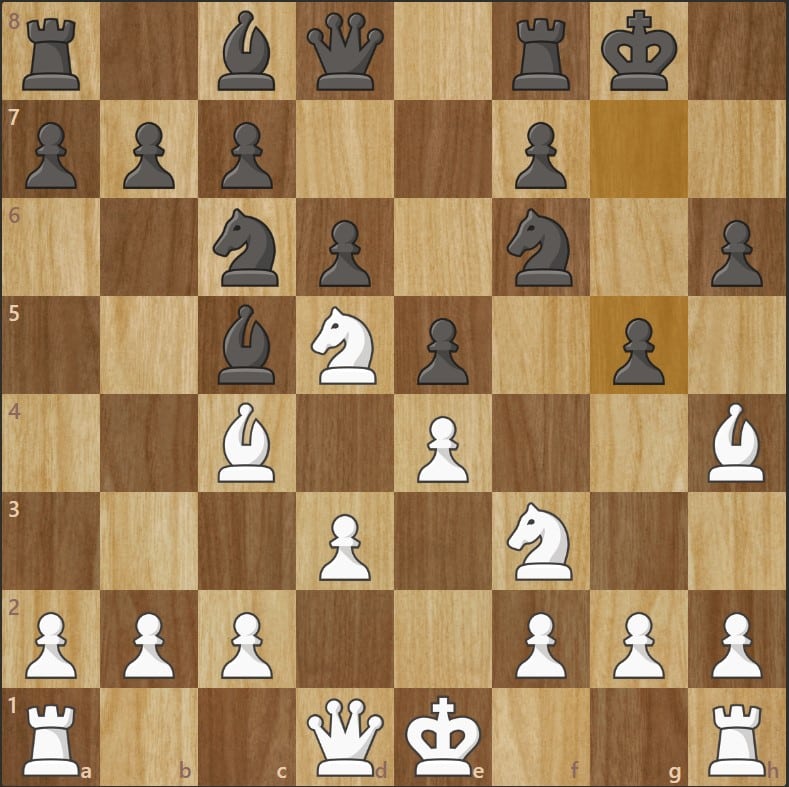
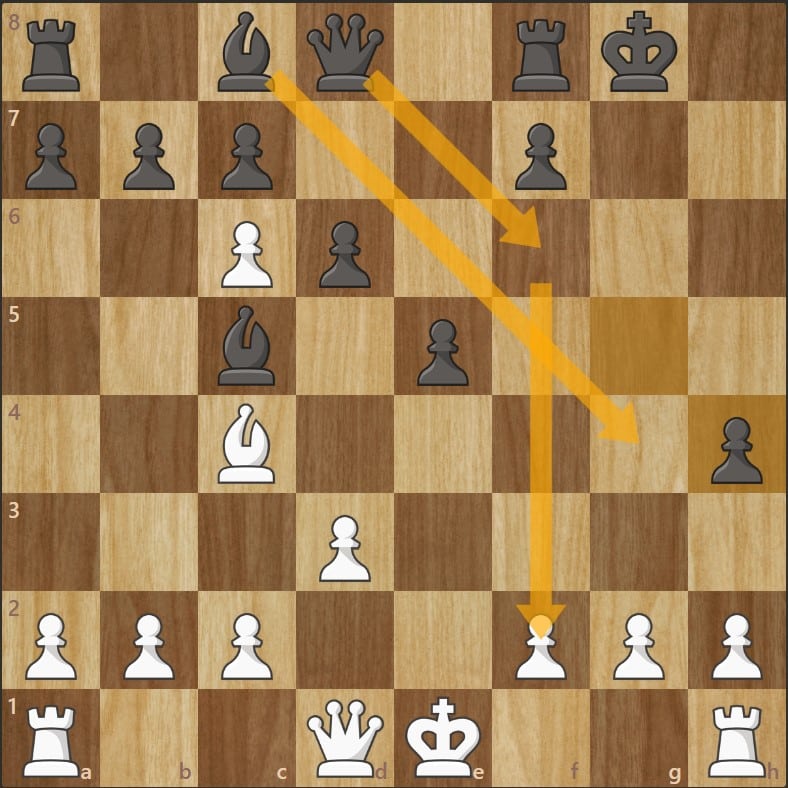
Black’s response
After the white knight sacrifice on g5, Black has a continuation that allows them to keep a clear material advantage. Here it is:
9… Nxd5
- Black counterattacks in the center immediately instead of accepting passively.
The white knight is sacrificed, but Black aims for central liquidation.
10. exd5 hxg5
- White recaptures the knight.
Black takes the bishop on h4.
11. dxc6 gxh4
- White captures the knight on c6.
Black captures the bishop on h4.
Summary :
White is down a bishop (in exchange for one pawn).
Black has the bishop pair and a slightly exposed king.
In this position, Black’s material advantage and White’s difficulty reaching the kingside are decisive. Black is winning.
Another option : Giuoco Piano
White can choose from the very beginning not to develop the knight to c3, focusing first on king safety and then preparing central control.
e4 e5
Nf3 Nc6
- Natural development, attacking/defending e5.
Bc4 Nf6
- The bishop targets the weak f7 square.
- Black develops the knight actively and attacks e4.
d3 Bc5
A quiet move : White reinforces e4 and avoids early complications.
The black bishop develops to an active square, aiming at f2.
O-O O-O
- Both sides castle quickly.
Re1 d6
- The rook supports e4 and prevents Black from pushing d5 immediately.
- Black strengthens the e5 pawn and maintains a solid structure.
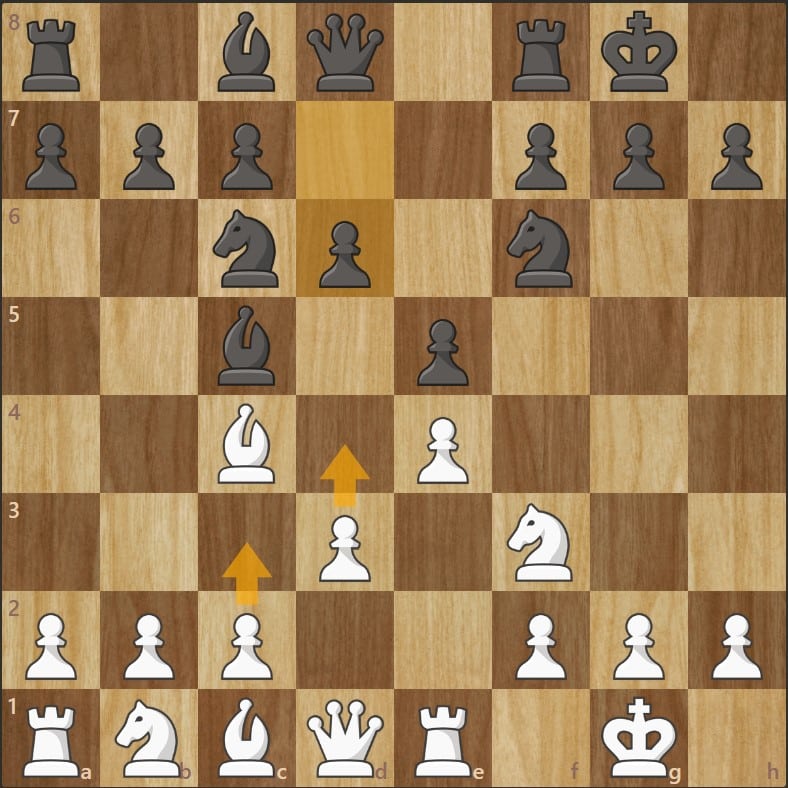
Slowly but surely
7. c3
- White prepares the central move d4 and also strengthens control of the d4 square, limiting access for the black knight.
7… Bg4
- An active move from Black.
They pin the knight on f3.
8.h3
- White immediately challenges the pin.
The black bishop must choose: exchange on f3 or retreat.
White’s later idea will be to bring the b1 knight toward the kingside and possibly exchange it for Black’s light-squared bishop.

The kingside attack !
8… Bh5
- The bishop maintains pressure on the knight on f3.
9. Nbd2
- Natural development preparing Nf1 followed by Ng3 — White’s main strategic plan.
9… Re8
- Supports e5 and activates a rook.
10. Nf1
10… Qd7
- Connecting the rooks.
11. Ng3
- The knight reaches its ideal square, pressuring f5 and h5.
11… Bg6
- The bishop retreats to avoid an early exchange and stay active.
12. Nh4
The idea is to exchange this troublesome black bishop with N×g6.
If Black recaptures with the h-pawn (…h×g6), they create structural weaknesses on the dark squares and on the kingside.
White then gains easier access to the kingside with the queen and the second bishop.
To avoid this...
7… a6
A flexible, multi-purpose move from Black :
- Prevents a bishop retreat to b5 after …Na5.
- Prepares …Ba7 (the “home bishop”) to maintain control of the a7–g1 diagonal.
- Keeps the option of playing …b5 later, gaining space on the queenside.
White's center
8. Bb3
- The white bishop retreats to b3 to stay active on the a2–g8 diagonal.
8… h6
- Prevents an annoying pin with Bg5.
9. Nbd2
- The white knight prepares the plan Nf1–g3.
9… Ne7
- The black knight redeploys, aiming for g6.
It also frees the c6 square for a pawn (c6/d5).
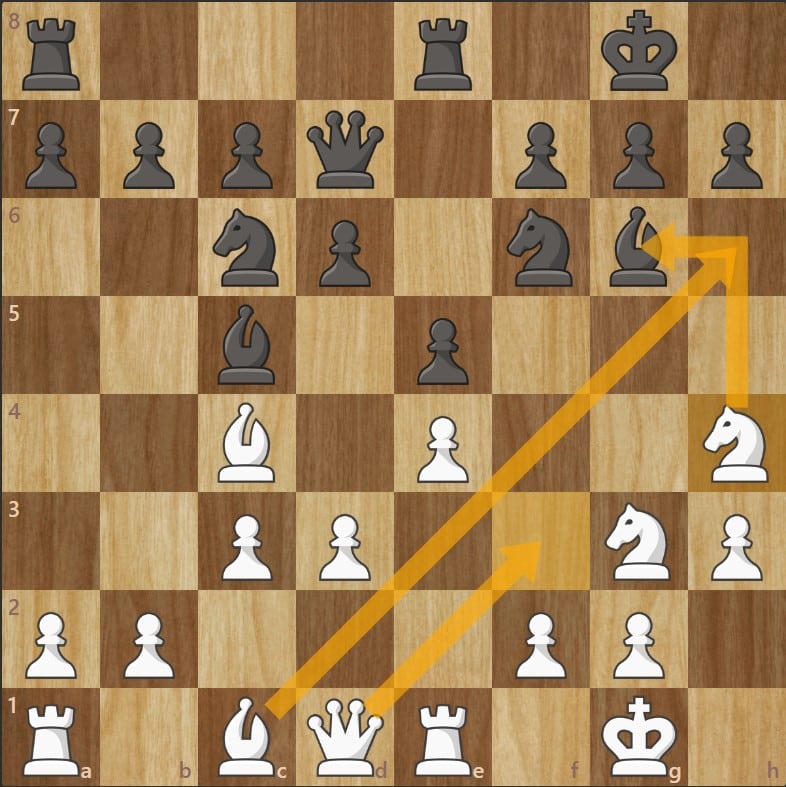
10. Nf1 Ng6
- The white knight begins its classic maneuver toward g3/f5.
- The black knight reaches g6, ready to put pressure on f4 and e5.
11. Ng3
- The white knight completes its maneuver.
It pressures f5, sometimes prepares f4, and supports a kingside attack.

White’s positional advantage
11… Ba7
- The black bishop retreats to safety on the a7–g1 diagonal.
This is the famous “house bishop”: it stays active without risking being chased away by a potential d4–d5.
12. h3 c6
- Prevents …Bg4, which would trade off the Nf3 — the defender of the d4 square.
- Also prepares g4/f4 in certain aggressive lines.
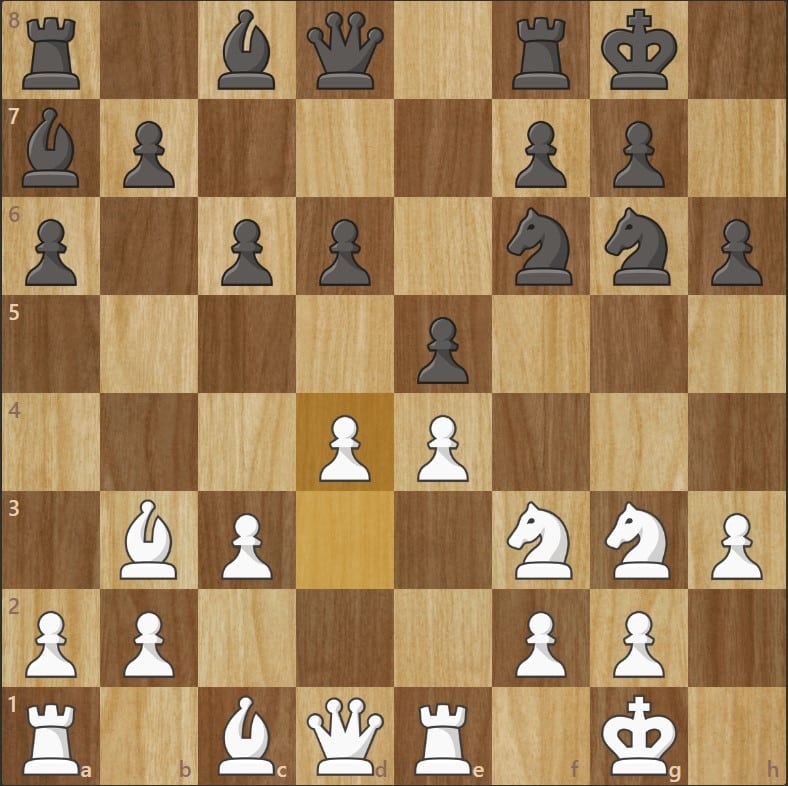
13. d4
- This is the key moment: White opens the center.
After completing all the preparatory moves (c3, Nbd2, Nf1–g3, h3), they strike.
Controlling the center is the main objective of their plan.
This sequence perfectly illustrates the philosophy of the modern Italian Game :
White prepares for a long time before playing d4,
Black retreats the bishop to a7 and remains solid,
A deep maneuvering battle follows around the center and the breaks …d5 / f4.
White has the more pleasant position to play.
Black is forced to react and hold firm.